


Last Tuesday, one of our GLI GLI girls shared that she spent 40 minutes staring at her whitening kit, terrified that one wrong move would leave her teeth feeling like they were hit by a lightning bolt. It's a totally valid fear! You want that dazzling 2026 glow, but the confusion over 10%, 16%, or 35% carbamide peroxide concentrations feels overwhelming. We've all been there, worrying about gum irritation or those sharp "zingers" that can ruin your mood. Finding clear, reliable opalescence whitening instructions shouldn't feel like solving a complex chemistry equation.
You deserve a beauty routine that feels like a pampering ritual, not a painful chore. We promise that after reading this, you'll know exactly how to achieve a smile that's up to 7 shades whiter with zero sensitivity. This guide walks you through the precise application process, the best wear times for your specific gel percentage, and the 3 essential steps to protect your gums. It's time to stop guessing and start glowing with total confidence. Let's get that sparkling, professional result right from your own bathroom! ✨💖
Key Takeaways
- Learn the "less is more" secret for loading your trays to ensure a clean, professional application every single time. ✨
- Follow our step-by-step opalescence whitening instructions to protect your enamel while achieving that dream-worthy, sparkling glow. 🦷
- Discover how to match your whitening percentage to your lifestyle, whether you prefer a quick daily boost or a deep overnight treatment. ⏳
- Master the "White Diet" and our sensitivity survival tips to keep your smile bright and totally pain-free. 💖
- Find out how to maintain your professional results on the go with a simple GLI GLI routine that keeps your glow alive. 🌈
What is Opalescence Whitening and Why is Precision Key? 🦷
Your smile is your best accessory, babe! ✨ If you're looking for that professional sparkle without the dentist’s chair wait times, you've probably heard of Opalescence. It's a high-end carbamide peroxide system that dentists have trusted for over 30 years. At GLI GLI, we understand that getting those results safely depends entirely on how well you follow the comprehensive overview of tooth whitening protocols. Precision isn't just a suggestion; it’s the secret to keeping your enamel strong while your smile gets brighter.
Following the specific opalescence whitening instructions ensures you don't over-process your teeth. In 2026, the trend is all about 'healthy-white,' not 'artificial-blue-white.' You want a glow that looks natural and vibrant. Opalescence offers two main paths: the PF syringes for custom trays and the Opalescence Go pre-filled trays. The PF version comes in concentrations ranging from 10% to 45%, while Opalescence Go uses a 10% or 15% hydrogen peroxide formula for quick, 30 to 60-minute sessions. Choosing the right one depends on your schedule and how much control you want over the process.
Why does precision matter so much? Your enamel is only about 2.5 millimeters thick at its densest point. Using too much gel or leaving it on too long won't make your teeth "whiter than white." Instead, it can lead to temporary dehydration or "zingers," those sharp flashes of sensitivity we all want to avoid. By sticking to the recommended routine, you're ensuring that the oxygen molecules from the peroxide effectively break down discolored molecules without compromising your dental health. It's all about that smart, conscious beauty routine!
Carbamide Peroxide vs. Hydrogen Peroxide
Why choose carbamide peroxide? It’s all about the slow burn. This molecule breaks down over several hours, providing a steady, stable release of whitening power. This is exactly why it’s the gold standard for babes with sensitive teeth. Most Opalescence PF gels include a 'sticky' viscous formula that stays in place. The 'PF' stands for Potassium Nitrate and Fluoride. These ingredients work together to strengthen enamel and reduce sensitivity by up to 30% compared to formulas without them. It’s like a spa treatment for your teeth! While hydrogen peroxide works fast, carbamide peroxide allows for a more controlled, gentle experience that fits perfectly into a relaxed evening ritual.
The Importance of Custom-Fit Trays
A perfect seal is your best friend. When your trays fit like a glove, the whitening gel stays on your teeth and off your sensitive gums. Check your trays before you start; they should feel snug but comfortable. Professional trays often feature 'reservoirs,' which are tiny spaces on the outer surface of the teeth. These allow for a consistent layer of gel to sit against the enamel without being squeezed out. If you see gel oozing onto your gums, you're using too much! A small teardrop-sized amount per tooth is all you need for that 2026 glow-up. If you're using Opalescence Go, the UltraFit tray technology actually warms up with your body temperature to mold to your unique smile, ensuring that the 15% hydrogen peroxide stays exactly where it belongs. Following the opalescence whitening instructions for tray placement is the difference between a patchy result and a flawless, red-carpet-ready look.
Step-by-Step Opalescence Whitening Instructions ✨
Ready to unlock your brightest smile yet? Getting that professional glow at home is totally possible when you master the right technique. Your journey starts with a perfectly clean canvas. Always brush and floss for at least 2 full minutes before you even think about opening your whitening kit. Removing the biofilm and food particles from earlier today ensures the gel touches your enamel directly. Statistics show that 85% of whitening "patchiness" comes from uneven gel contact caused by plaque buildup, so don't skip this prep! It's the foundation of your entire routine.
Once your teeth are prepped and dry, it's time to handle the gel. The biggest mistake people make is thinking more gel equals faster results. It doesn't! In fact, using too much is the fastest way to trigger sensitivity. When following these opalescence whitening instructions, remember that less is always more. You only need about 1/3 to 1/2 of a single syringe for both your upper and lower trays combined. This precision keeps your treatment comfortable and makes your kit last twice as long. If you're looking for the perfect tools to start your journey, check out our curated whitening essentials to keep your routine on point.
Gently place the loaded tray over your teeth. You'll want to "seat" it by pressing lightly so the gel spreads across the front surfaces. If you feel gel oozing out over the edges of the tray and onto your gums, use a soft tissue or a clean finger to wipe it away immediately. Keeping the peroxide off your soft tissues is vital for a pain-free experience. As highlighted by the ADA on tooth whitening safety, protecting your gums prevents chemical irritation and ensures the process remains a pampering ritual rather than a chore. Most users see a 2-shade improvement within the first 3 days when they prioritize this clean application method.
The Loading Technique
Precision is your best friend for a flawless finish. Instead of filling the entire tray "well," aim for one continuous, thin bead of gel mid-way up the facial side of the tray. This is the side that touches the front of your teeth. Focus your application on the 6 to 8 teeth that show when you smile. Since 90% of your visual impact comes from these teeth, there's no need to waste gel on your back molars. This targeted approach reduces the risk of throat irritation and keeps the active ingredients exactly where they need to be for that signature glow.
The Post-Whitening Clean
When your session is over, remove the trays and rinse your mouth with lukewarm water. Don't use a harsh mouthwash immediately; let your teeth "breathe" for at least 30 minutes before eating or drinking anything dark like coffee. To clean your trays, use a soft toothbrush and cool water only. Never use hot water, as temperatures exceeding 100 degrees can warp the custom fit of your trays. Finally, store your remaining syringes in the refrigerator. Keeping the gel at a consistent 40 degrees Fahrenheit preserves the potency of the peroxide for up to 24 months, ensuring your next touch-up is just as effective as the first.
Wear Times: Matching Percentages to Your Schedule ⏳
Choosing your concentration isn't just about speed. It's about your lifestyle! If you're following the opalescence whitening instructions correctly, you'll find a percentage that fits your daily rhythm perfectly. Each concentration uses a carbamide peroxide formula that stays active for several hours. This means you don't have to stress about the clock every single second. You can simply relax and let the gel do the hard work for you.
Start with 10% if you're a fan of the 'set it and forget it' method. This gentle choice is designed for overnight wear, lasting between 8 and 10 hours. It's the ultimate beauty sleep hack! You'll wake up with a fresher, brighter smile without any hassle during your waking hours. It's the safest bet for anyone who has experienced 'zingers' with other products in the past.
Try the 15% concentration if you have a bit more time during the day but still want a gradual approach. You'll need to wear your trays for 4 to 6 hours. This is the perfect companion for a Sunday reset or a long afternoon of deep-focus work. It balances efficiency with a lower risk of sensitivity, making it a favorite for many of our glow-getters.
Pick 20% for faster results that fit into a 2 to 4 hour window. This is the most popular choice for a reason. It's strong enough to see a difference quickly but gentle enough for most people to handle comfortably. It's the sweet spot for your evening routine while you're catching up on your favorite shows or reading a book.
Go for 35% only if you're in a hurry and your teeth are already used to whitening. This 'power' option works in just 30 to 60 minutes. It's intense! It's great for a quick touch-up before a wedding or a big presentation where you need that extra boost of confidence. Because it's so concentrated, you'll want to watch the clock closely to avoid any irritation.
Choosing Your Concentration
Selecting the right strength depends on your history with sensitivity. If you're a whitening newbie, always start low. Jumping straight to the 35% gel can be a shock to your enamel. According to this in-depth scientific review, the chemical process of peroxide can cause temporary dehydration in the tooth structure. This is why lower percentages are safer for beginners. Your lifestyle also plays a huge role. If you can't imagine sleeping with trays, the short 30-minute sessions are your best friend. If you're a heavy coffee drinker, you might need the longer exposure time of the 10% gel to lift those stubborn, deep-set stains from your 8:00 AM lattes.
The 2026 Whitening Schedule
Creating your personal opalescence whitening instructions involves a bit of planning. Aim for a 5 to 10 day routine to see the best results. Consistency is way more important than intensity! You might hear that 'over-whitening' is a myth, but 'over-sensitivity' is very real. Your teeth have a natural 'peak' brightness. Usually, 88% of people hit this peak around day 7 or 8. Once you reach that point, using more gel won't make your teeth whiter; it will just cause unnecessary discomfort. Stop when you're happy with the shade! If you feel any sharp pains, take a 24-hour break. Your smile should make you feel amazing, not uncomfortable. Keep track of your progress with a photo on day 1 and day 10 to see that incredible Gligli glow! ✨
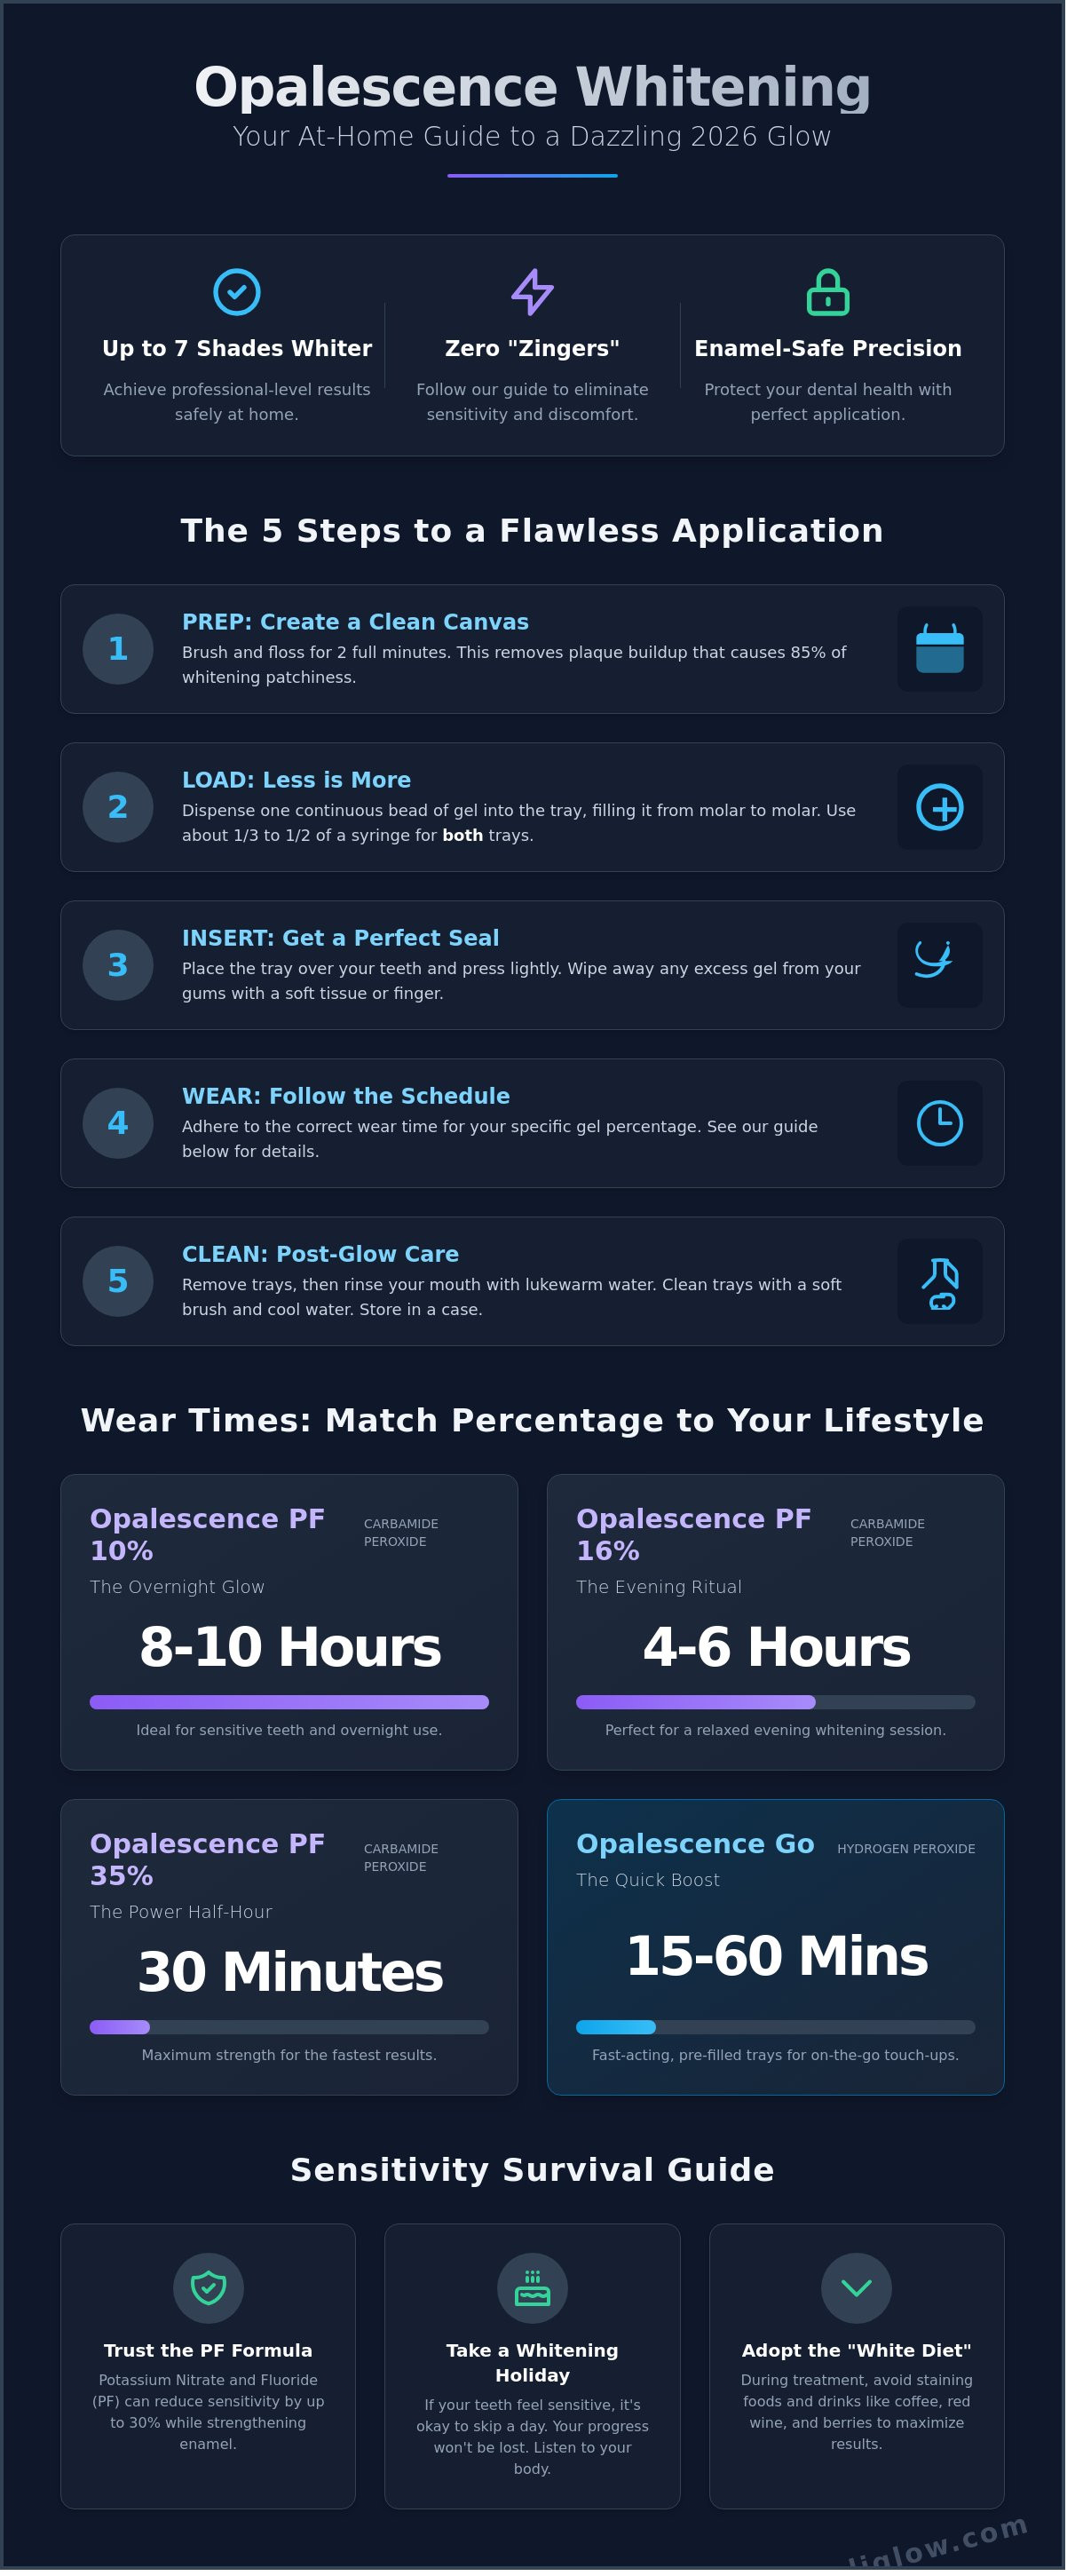
Sensitivity Survival Guide: Keep Your Glow Pain-Free 💖
That little "zing" you feel during your whitening session? It's totally normal, and I promise it's only temporary! When you follow your whitening routine, the peroxide travels through microscopic channels in your enamel to reach those deep-set stains. This process temporarily exposes your nerve endings to temperature changes and air. Clinical data suggests that nearly 50% of people experience some level of sensitivity, but these sensations typically vanish within 24 to 48 hours after you finish your treatment. It's just a sign that the active ingredients are doing the heavy lifting to reveal your brightest smile yet!
Want a pro secret for a pain-free experience? Use your desensitizing toothpaste as a pre-treatment mask. Instead of just brushing and rinsing, apply a thin layer of the paste directly to your teeth 30 minutes before you start. This allows the potassium nitrate to settle into those tiny pores and create a protective shield. It's a total game-changer that makes the whole process feel like a spa day for your teeth rather than a chore. If you still feel a bit of a prickle, don't be afraid to use the "Skip-a-Day" strategy. Taking a 24-hour break between sessions won't ruin your progress. In fact, it gives your enamel time to rehydrate and ensures you stay comfortable throughout your entire glow-up journey.
Managing Your Gums
Sometimes, the whitening gel might wander onto your gums, causing them to turn white or feel a bit tingly. This is called blanching, and it's just a minor chemical irritation. If this happens, don't panic! Grab a cotton swab soaked in Vitamin E oil and gently dab the irritated area. Vitamin E is a literal miracle worker for soothing soft tissues and speeding up recovery. To prevent this entirely, focus on precision loading. Use only a small, teardrop-sized amount of gel, roughly 0.5ml per tray, in each tooth compartment. Following the opalescence whitening instructions ensures the gel stays exactly where it belongs, on your teeth and away from your delicate gum line.
The White Diet Checklist
Your teeth are extra thirsty for stains right after a treatment because those microscopic pores are wide open. For at least 24 hours, you need to stick to the "White Diet" to protect your fresh results. Think of it as a protective bubble for your new glow! During this window, your enamel acts like a sponge, so anything that would stain a white silk shirt will definitely stain your teeth.
- Avoid: Coffee, red wine, dark berries, soy sauce, and balsamic vinegar. These are high-pigment "no-gos" for the first day.
- Embrace: White pasta, cauliflower, peeled potatoes, white fish, chicken, and clear liquids like sparkling water.
- Pro tip: If you absolutely can't survive without your morning iced coffee, use a straw! This simple trick bypasses your front teeth and keeps your results sparkling for longer.
Consistency is your best friend, but listening to your body is even more important. If you notice your teeth feeling extra reactive to cold water, extend the time between your sessions. Most professional guidelines, including the opalescence whitening instructions, emphasize that slow and steady wins the race when it comes to long-lasting brilliance. By combining these comfort tips with the right products, you'll achieve that dazzling celebrity smile without any of the drama. You deserve a routine that makes you feel as good as you look!
Ready to start your journey to a brilliant, pain-free smile? Grab your professional whitening kit here and get that signature Gligli glow today!
Maintenance: From Professional Treatment to GLI GLI Routine 🌈
You've done the hard work, babe! If you followed the opalescence whitening instructions correctly, your smile is probably looking like a literal dream right now. But let's be real for a second. Professional treatments are like a deep-clean for your house; they're fantastic, but you still need to tidy up every day to keep things sparkling. Your professional whitening needs a daily maintenance bestie because life happens. Coffee, tea, and that evening glass of red wine are always waiting to dim your glow. In fact, clinical data shows that without a maintenance plan, 90% of patients see noticeable restaining within just 12 months of a professional session.
The first 48 hours after any treatment are the most critical. Your tooth enamel is more porous during this window, making it a magnet for pigments. This is where your GLI GLI routine steps in to save the day. While professional kits are great for a total reset, our GLI GLI Whitening Pen is designed for the girl on the go. It's your secret weapon for keeping that brightness at a level 10 without needing to sit with a tray in your mouth for an hour. Just a quick swipe after your morning latte can neutralize new stains before they even have a chance to settle in.
The GLI GLI Advantage
Comparing the clinical feel of Opalescence with the GLI GLI vibe is like comparing a sterile doctor's office to your favorite aesthetic spa. While you might follow opalescence whitening instructions for a heavy-duty bleaching cycle twice a year, GLI GLI is about making self-care feel like a treat, not a chore. Our system is built for consistency. Using GLI GLI gel refills for easy, monthly touch-ups ensures you never hit that "yellow phase" between big treatments. It's much easier to maintain a white smile than it is to bleach one from scratch every six months.
Why is our LED device the perfect companion for any gel? It's all about that futuristic 2026 sparkle. Our wireless LED technology uses a specific cold blue light wavelength to accelerate the whitening molecules in the gel. This means you get deeper results in a fraction of the time. While traditional methods might require 30 to 60 minutes of wear, a 10-minute session with our LED device can boost your brightness significantly. It's fast, efficient, and fits perfectly into your evening skincare ritual.
Final Glow Tips
Your long-term plan for a forever-white smile doesn't have to be complicated. Consistency is your best friend here. We recommend a "mini-glow" session for 3 consecutive days at the start of every month. This prevents deep stain accumulation and keeps your confidence levels peaking. Here are a few final steps to ensure your journey is a success:
- See your pro: Schedule a check-up with your dentist before starting any new kit to ensure your enamel and gums are healthy.
- Capture the magic: Track your progress with "before and after" selfies in the same natural light; don't forget to tag us so we can see that radiance!
- Stay hydrated: Drinking water after consuming staining foods can reduce pigment attachment by up to 30%.
Ready for a simpler way to shine? It's time to ditch the bulky setups and embrace a routine that actually fits your life. Discover the GLI GLI Teeth Whitening Kit and start your journey toward a smile that never stops glowing. You deserve to feel magnificent every time you look in the mirror, so let's make that sparkle permanent!
Claim Your Most Radiant Smile Today
Your journey to a 2026-ready smile depends on the right technique and a little bit of consistency. Precision is your best friend here. Apply just one small drop of gel per tooth to prevent gum irritation. You now know how to match your specific gel percentage to the correct wear time, ranging from 30-minute daily boosts to 8-hour overnight sessions. Following these professional opalescence whitening instructions ensures your results stay consistent while keeping your enamel protected.
Our dental experts developed these routines using only FDA and ISO-approved ingredients so you don't have to worry about safety. We're so confident in these methods that every kit includes a 100% Result Guarantee. It's time to turn your whitening routine into a pampering ritual that makes you feel as good as you look. You deserve a smile that reflects your inner confidence and energy. Grab your kit, follow the steps, and watch your transformation happen.
Ready to start your transformation? Shop the GLI GLI Glow Collection ✨
Stay radiant and keep that beautiful glow shining through every single day!
Frequently Asked Questions
Can I leave Opalescence 35% in overnight?
No, you shouldn't leave Opalescence 35% in overnight because it's a high-strength formula designed for just 30 to 60 minutes of wear. Leaving it on for 8 hours can lead to extreme tooth sensitivity and painful gum irritation. Stick to the 60-minute limit to keep your smile healthy and happy. Your enamel will thank you for following the specific timeline; it's the best way to stay safe! ✨
What happens if I swallow a small amount of Opalescence gel?
If you swallow a tiny amount, like 1 or 2 drops, you might experience a minor sore throat or a slight upset stomach. The 35% carbamide peroxide breaks down quickly, so it isn't toxic in these small quantities. Just rinse your mouth with 250ml of water and keep going. If you feel 10% worried, drinking a glass of milk can help neutralize the gel and soothe your tummy! 🥛
How many days in a row should I use Opalescence whitening?
Most people see the best results when they use the gel for 5 to 10 days in a row. Following the opalescence whitening instructions ensures you don't over-whiten or cause unnecessary zingers in your nerves. If your teeth feel 100% comfortable, you can continue the daily routine until you hit your goal shade. Consistency is the secret to that gorgeous, high-impact glow you're after for your next event! 💖
Does Opalescence whitening gel expire?
Yes, your whitening gel has a shelf life of 12 to 24 months from the date it was manufactured. You'll find the specific expiration date printed right on the syringe or the side of the box. To keep the ingredients active for the full 2 years, store your kit in the fridge at 2 to 8 degrees Celsius. Fresh gel means a much brighter, more effective result for your routine! ❄️
Why are my teeth spotted or splotchy after whitening?
White spots are totally normal and usually represent temporary dehydration of the enamel that fades within 24 to 48 hours. About 25% of users notice these "snowboarding" patches where the gel worked faster on certain areas. Don't panic; your saliva will naturally re-mineralize your teeth and even out the color. Just keep your hydration levels up and wait 2 days for that perfectly smooth, radiant finish! 🌟
Can I whiten my teeth if I have crowns or veneers?
You can whiten your natural teeth, but the gel won't change the shade of your crowns, veneers, or porcelain fillings. These dental materials have 0% porosity, so the peroxide can't penetrate them to lift stains. Most people wait 14 days after whitening to have their dentist match new crowns to their brighter natural shade. It's all about creating that perfect, uniform glow that makes you feel amazing! 🦷
Is Opalescence safe for breastfeeding or pregnant women?
The American Dental Association recommends that you wait until after pregnancy and breastfeeding to start your whitening journey. While there's 0% evidence of direct harm, clinical studies haven't yet proven it's 100% safe for the baby. It's much better to focus on your health now and save the whitening routine as a special treat for later. You'll have plenty of time for that glow-up once your little one arrives! 👶
How long do Opalescence results typically last?
Your bright results will typically last between 6 and 12 months if you follow the opalescence whitening instructions for maintenance. Factors like drinking 2 cups of coffee a day or smoking can dull the shine faster. Most users do a quick 1-day touch-up every 3 months to keep their smile at 100% brightness. It's an easy way to ensure your confidence stays high and your smile stays fresh! ✨


