


Have you ever zoomed into a high-resolution headshot only to realize your smile looks more like "vintage parchment" than "professional power"? It's a total heart-sink moment! When you're prepping for a big shoot, getting whiter teeth for professional photos is usually at the top of the to-do list, but the fear of ending up with "Ross Geller" neon teeth is very real. You want to look polished and bright, not like a walking AI filter. We totally get it; your brand's built on authenticity and that gorgeous, natural spark. 📸✨
Achieving a camera-ready glow doesn't have to involve last-minute panic or expensive dental drama. You deserve a healthy-looking smile that makes you want to grin widely the second the shutter clicks. In this 2026 prep guide, we're sharing exactly how to get that radiance safely and effectively. We'll explore the best timing for your whitening routine, the power of modern LED kits, and how to maintain that sparkle so you can step onto any set with total confidence. Let's get you ready for your close-up! 🌟💎
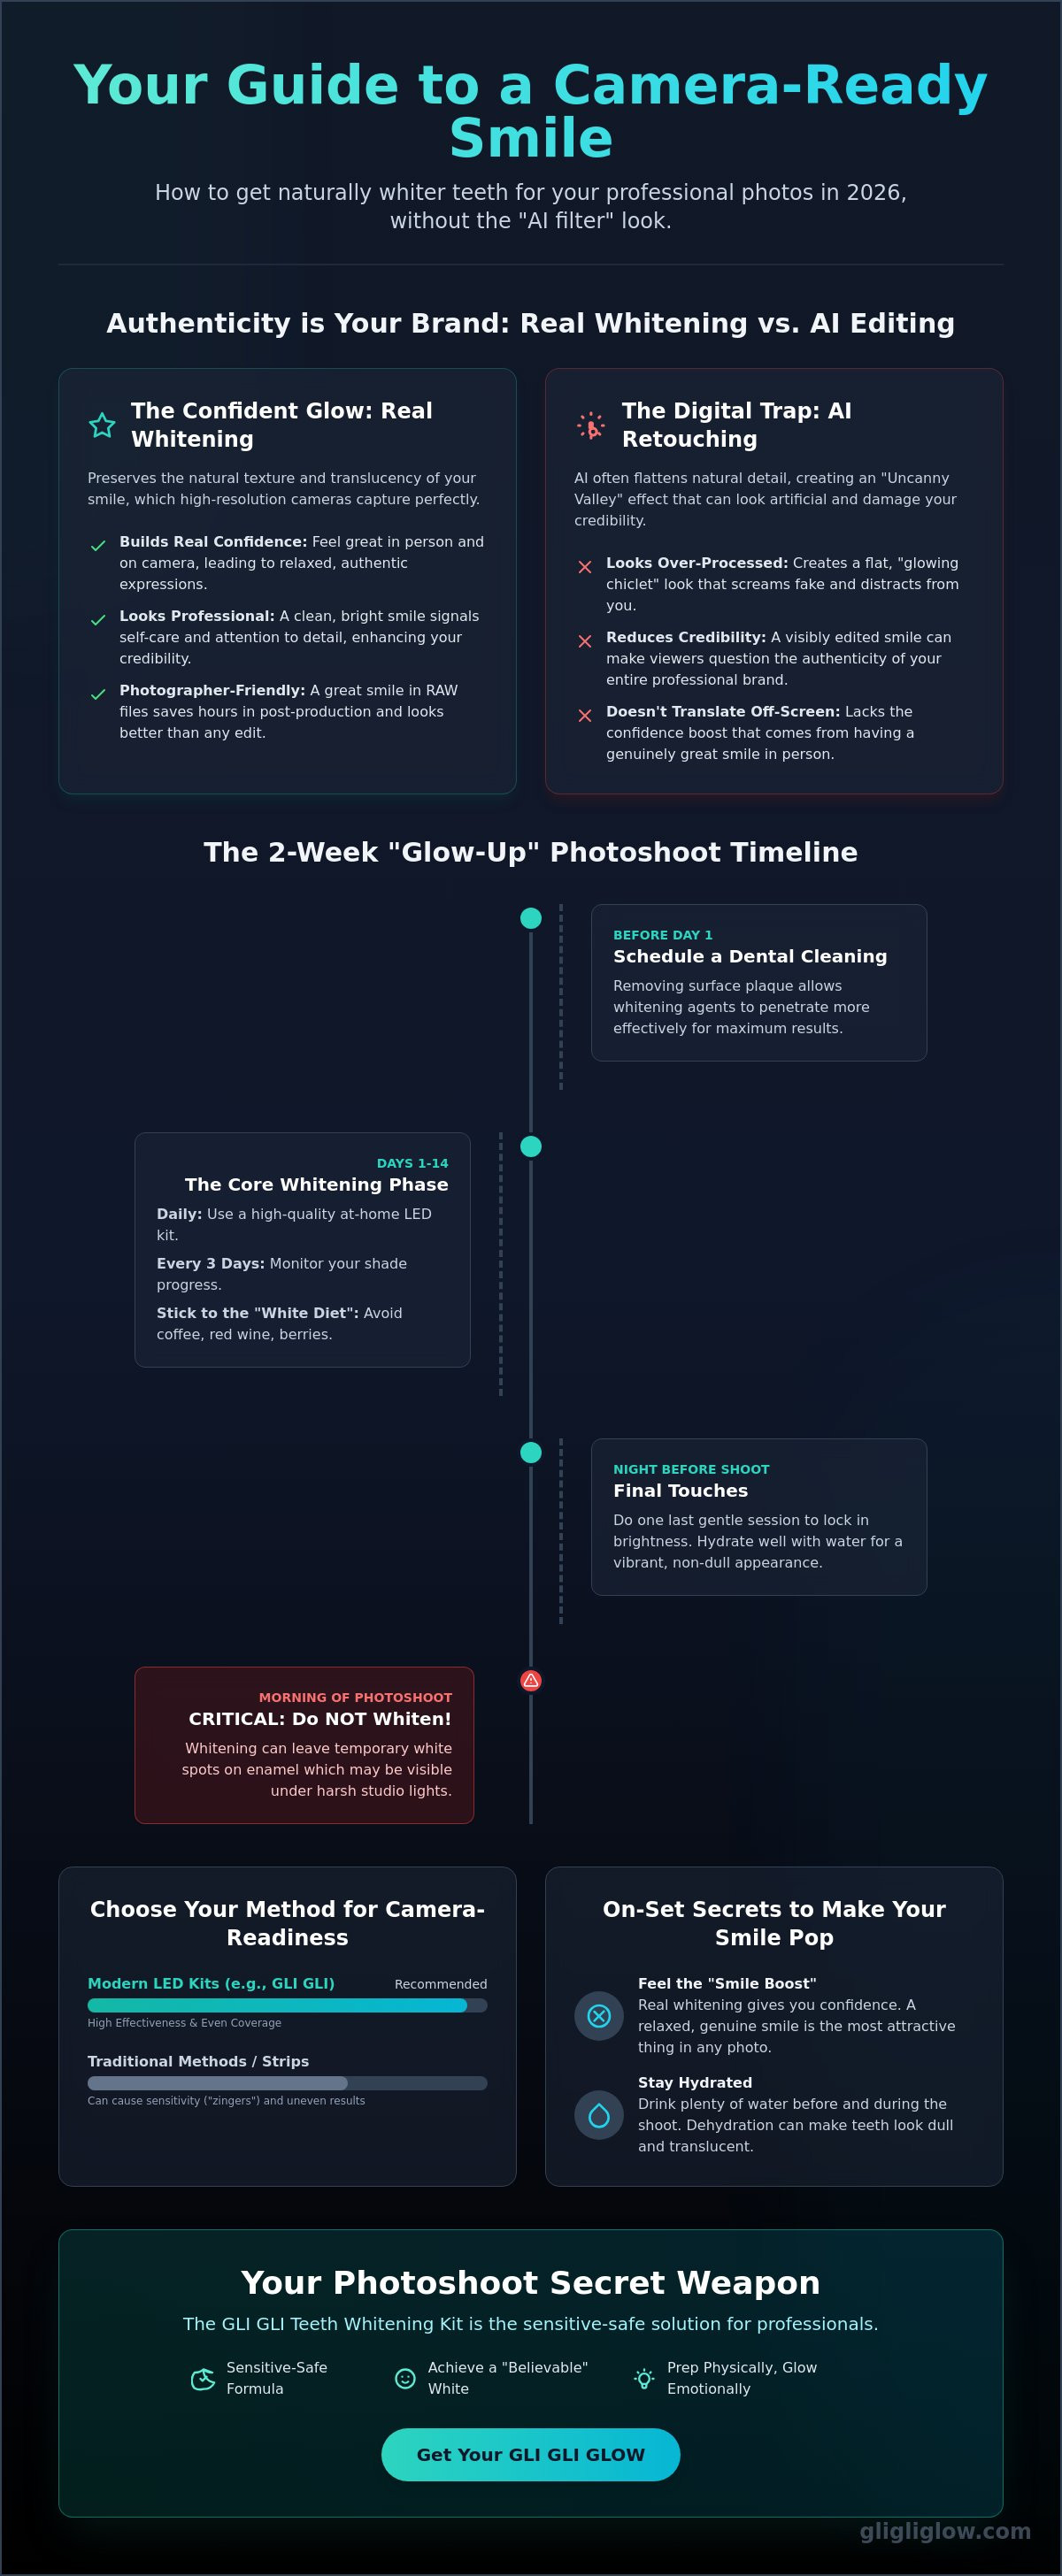
Key Takeaways
- Why relying on AI filters for your headshots can actually damage your professional brand and credibility.
- The exact 14-day protocol you need to achieve maximum lift and whiter teeth for professional photos without the "Ross Geller" effect.
- How to choose between LED kits and traditional methods to ensure even coverage for those high-resolution close-ups.
- Pro on-set secrets, including the "Lipstick Trick," to keep your smile looking bright and fresh under intense studio lighting.
- Discover why the GLI GLI Teeth Whitening Kit is the sensitive-safe secret weapon for professionals prepping for their big shoot in 2026.
Why Real-Life Whitening Beats AI Photo Retouching
Have you ever seen a LinkedIn profile where the person's teeth look like glowing neon chiclets? It's distracting! In 2026, high-resolution cameras and professional lighting setups are sharper than ever. They capture the tiny nuances of your enamel, which is exactly why relying on a quick AI fix can backfire. When you're aiming for whiter teeth for professional photos, the goal is a radiant, believable look that screams "I take care of myself," not "I found a new filter."
Professional photographers usually work with RAW files. These files hold massive amounts of data, including the subtle shadows and textures of your teeth. When an AI app tries to whiten a smile, it often flattens those textures. This creates the "Uncanny Valley" effect. It’s that subtle sense that something is artificial, which can actually hurt your professional credibility. If you want a comprehensive overview of tooth whitening, you'll find that real results involve lifting stains from the inside out, preserving that beautiful, natural shine that digital tools just can't replicate.
The Limitations of Digital Editing in 2026
Digital tools are everywhere, but they still struggle with the way studio lights wrap around your smile. AI often misses the tiny reflections that make a smile look "alive." Heavy editing can make your headshot look "over-processed," which is the last thing you want for your personal brand. Healthy, bright teeth have a specific translucency. Apps just give you a flat white-out look. Your audience wants to see the real you, just at your absolute best!
Building In-Person Confidence
There is a magic that happens when you feel good about your smile. We call it the "Smile Boost." If you're worried about yellowing, you might unconsciously hold your lips tighter or tilt your head to hide your teeth. The camera sees that tension! When you've prepped with a GLI GLI Teeth Whitening Kit, that worry disappears. You pose better because you feel better. Your muscles relax, your expression becomes authentic, and your confidence becomes the most attractive thing in the frame. That's the power of the GLI GLI Glow; it’s about physical prep meeting emotional radiance. Photographers love a clean base because it lets them focus on your personality rather than spending hours fixing "parchment" teeth in post-production.
The Photoshoot Preparation Timeline: When to Start
Timing is everything when you're prepping for the camera! You wouldn't try a brand-new, intense skincare peel two hours before your headshot session, right? Your teeth deserve that same level of care. If you want whiter teeth for professional photos, planning ahead is the secret to a stress-free, radiant result. While some people look for an "instant" fix, the most beautiful, natural-looking results in 2026 come from a consistent routine that respects your enamel and your comfort. 📸✨
The 14-day window is our absolute favorite. Why? Because it gives the whitening agents enough time to break down deep stains without causing major sensitivity. If you can, schedule a professional dental cleaning right before you start your 2-week countdown. Removing surface plaque allows your whitening gel to penetrate much more effectively! Always keep in mind the safety of teeth whitening; rushing the process with high concentrations can lead to "zingers" that make it hard to smile naturally for the photographer. A gradual lift ensures you look like yourself, just more vibrant.
The 2-Week "Glow-Up" Strategy
Ready to commit to that camera-ready look? Here is your step-by-step plan for success! First, grab a high-quality at-home teeth whitening kit and start your sessions daily. Second, monitor your shade changes every three days. In 2026, the trend is all about a personalized, "believable" white that complements your skin tone. Third, stick to the "White Diet." Avoid coffee, red wine, and dark berries. If it can stain a white t-shirt, it can stain your teeth during this active phase! ☕❌
The Night-Before Checklist
The sun is setting and your shoot is tomorrow! Now is the time for final touches, not miracles. Use your LED device for one last gentle session to lock in that brightness. If your gums feel a bit tender, swap your regular gel for a sensitive whitening strip. This ensures you won't be dealing with discomfort when the photographer asks for a "big grin." Also, drink plenty of water! Dehydration can make your teeth look translucent and dull. A hydrated smile is a vibrant smile. 💧💎
Never whiten on the actual morning of your photoshoot. Whitening can sometimes leave temporary white "desiccation" spots that take a few hours to fade. You want your enamel to be perfectly even and settled before you step under those intense studio lights. For the most predictable and stunning results, trust the process and let your GLI GLI routine do the heavy lifting in advance. You've got this! 🌟
Comparing Whitening Methods for Camera Readiness
Choosing how to brighten your smile can feel like a maze. Should you drop hundreds of dollars at a dental office or try a DIY hack you saw on a forum? While some online threads suggest using baking soda, that's often a recipe for disaster under studio lights. Abrasive powders can create tiny scratches and uneven patches that look terrible in high-resolution RAW files. For whiter teeth for professional photos, you need a method that offers both consistency and control. Understanding the science behind tooth whitening helps you see why professional-grade ingredients are much safer for your enamel than kitchen cupboard experiments. 🧪✨
In-chair bleaching is fast, but it can be quite aggressive. Many professionals now prefer at-home LED kits because they allow you to "dial in" your perfect shade over a week or two. If you go too bright in one hour at the dentist, you're stuck with that "neon" look on shoot day. At home, you can stop exactly when you hit that healthy, natural glow. Plus, the convenience of whitening while you answer emails is a total win for a busy schedule! It turns a chore into a little self-love ritual. 💖
Professional Results at Home
Kits using dental-grade gels generally outperform basic drugstore strips because the gel can reach the curved edges and crevices of each tooth. This ensures your smile looks uniform even in tight close-ups where every detail matters. LED devices are the real game-changers in 2026. They help the active ingredients work faster and more effectively. If you have sensitive gums or prefer a cleaner label, check out our natural whitening strips guide to learn about peroxide-free options like PAP that are trending for 2026 shoots. 🌿
Avoiding the "Fake White" Look
The biggest mistake is aiming for paper-white teeth. Real teeth have depth and translucency! A great rule of thumb is to match your tooth shade to the whites of your eyes. This creates a balanced, harmonious look that feels authentic. Professional kits give you the flexibility to maintain this natural depth. You want to look like you have a high-end wellness routine, not like you've been digitally pasted into your own headshot. Using a purple toothpaste on the morning of your shoot can also provide a temporary "color-correcting" boost. It neutralizes yellow undertones, giving you a bright "pop" that looks incredible under studio lights without looking artificial. 🌟
On-Set Tips: Making Your Smile Pop Under Studio Lights
The big day has finally arrived! You've put in the work with your 14-day prep, and now it's time to step in front of the lens. But even with the best preparation, studio environments can be tricky. Professional lighting is much more intense than the soft glow of your bathroom mirror. To ensure you actually get whiter teeth for professional photos, you need to know how to work with the camera, not against it. It's all about those final, high-impact adjustments that turn a good headshot into a stunning one. 📸✨
One of the easiest ways to boost your brightness is the "Lipstick Trick." If you're wearing makeup, always reach for cool-toned shades with blue undertones. Think berry reds, plum, or "cool" pinks. These shades naturally cancel out yellow tones in your teeth, making them look instantly whiter. Stay far away from corals, oranges, or warm browns! These colors can make even a bright smile look a bit sallow under high-intensity strobes. It’s a tiny change that makes a massive difference in your final RAW files.
The Camera Flash Effect
High-definition cameras and strobe lights are incredibly powerful. Sometimes, they can actually "see through" the surface of your enamel if it’s looking a bit thin or dehydrated. This can make your teeth appear slightly grey or translucent in photos. To prevent this, it's a great idea to use a specialized toothpaste to strengthen and remineralize your enamel during your prep weeks. On set, try angling your head slightly. A tiny tilt can help the light bounce off the flat surfaces of your teeth, creating a bright, healthy reflection rather than a dull shadow. 💡
The "Emergency" Touch-Up Pen
Ever wonder how influencers keep their smiles so perfect during all-day shoots? The GLI GLI Teeth Whitening Pen is the ultimate makeup artist secret. It’s perfect for those mid-shoot touch-ups if you’ve had a quick coffee break or just want an extra boost of confidence. Simply paint a thin layer onto your teeth, wait about 60 seconds for it to dry, and you're ready for the next setup. It provides a quick, even "pop" of brightness that fills in any tiny imperfections. Just remember to keep a water bottle nearby too! Hydrated teeth look shinier and more vibrant on camera, while "dry mouth" can make your smile look matte and flat. 💧💎
Ready to be the most confident person in the room? Keep a GLI GLI Teeth Whitening Pen in your kit for every session and never worry about a dull smile again. You've done the prep, now go out there and own your glow! 🌟
The GLI GLI Glow: Your Photoshoot Secret Weapon
You've done the research. You've mastered the timeline. Now it's time to choose the tool that actually delivers on that camera-ready promise. When you're aiming for whiter teeth for professional photos, you need a partner that values your health as much as your aesthetic. In 2026, the GLI GLI Teeth Whitening Kit has become the go-to choice for influencers and professionals who refuse to compromise. It’s not just about getting bright; it’s about getting bright safely! 📸✨
We know you're busy. Between location scouting and wardrobe changes, you don't have time for complicated procedures. That’s where the GLI GLI LED Whitening Device shines. It’s sleek, portable, and designed for a modern, on-the-go lifestyle. You can literally brighten your smile while prepping your outfit! Best of all, our formula is crafted to ensure zero sensitivity. You can step onto that set without the fear of "zingers" or discomfort. We’re so confident in the results that we offer a Result Guarantee. You’ll see the confidence in every single frame the photographer captures. 💎🌟
Crafted for Perfectionists
We don't believe in "good enough." Our boosters are made with ingredients that meet strict safety standards. By involving dental experts in every step of the development process, we've created a formula that effectively lifts stains while protecting your precious enamel. But it’s more than just science! We want your whitening routine to feel like a kényeztető rituálé. It’s a moment of self-love in your busy day. When you apply the gel and activate the LED light, you're not just prepping for a photo; you're investing in your own radiant energy. 💖🌿
Get Ready for Your Close-Up
The camera is waiting, and you're ready to own the room. To make sure you have everything you need, it's time to grab the full GLI GLI Teeth Whitening Kit today. Don't forget to toss a GLI GLI Teeth Whitening Pen into your gear bag for those essential mid-shoot touch-ups we mentioned earlier! It’s the ultimate insurance policy for a long day under the lights. 🛍️🖋️
Your smile is your most powerful professional asset. It’s the first thing people notice on your bio and the last thing they remember after a meeting. Don't leave it to chance or fake-looking filters. Trust the GLI GLI Glow to bring out your most authentic, vibrant self. Go ahead and grin widely. The camera is going to love you! Glow on! 🌟📸
Ready for Your Most Radiant Close-Up?
Authenticity is your best brand asset. We've explored why real enamel beats AI retouching every time and how a structured 14-day timeline ensures you look polished without the panic. Getting whiter teeth for professional photos isn't just about the shade; it's about the confidence that comes from knowing you're truly camera-ready. You've got the on-set tips and the secret weapon strategies to make your smile pop under any lighting setup. You deserve to feel as vibrant as you look!
Don't leave your first impression to a last-minute filter or a grainy edit. Our formula uses FDA and ISO-approved ingredients and was developed alongside dental experts to keep your enamel safe and sensitive-free. With our comprehensive result guarantee, you can focus on your poses while we handle the glow. It's time to treat your smile to the expert care it deserves before the shutter clicks. You've put in the work; now let your natural spark take center stage.
Get your camera-ready smile with the GLI GLI Teeth Whitening Kit and step in front of the lens with total power. We can't wait to see you shine! Glow on! 🌟
Frequently Asked Questions
How long before my photoshoot should I start whitening my teeth?
You should ideally start your whitening routine 14 days before your scheduled photoshoot. This two-week window allows the active ingredients to lift deep stains gradually while minimizing any risk of temporary white spots or sensitivity. Starting early ensures your enamel has time to rehydrate and settle, giving you a vibrant, natural look that high-definition cameras love to capture. 📸✨
Will whitening my teeth make them look blue or fake in professional photos?
Professional whitening kits won't make your teeth look blue or fake as long as you don't over-whiten. The goal for whiter teeth for professional photos in 2026 is a healthy, believable brightness that matches the whites of your eyes. By using a kit that allows for gradual shade control, you can stop once you reach your perfect, radiant glow rather than ending up with an artificial, monochromatic look.
What is the best way to whiten teeth quickly if my shoot is tomorrow?
If your shoot is tomorrow, the best quick fix is a single session with an LED whitening kit followed by a purple color-correcting toothpaste. The LED device provides the most intense lift in a short time, while the purple paste neutralizes yellow undertones for an immediate visual boost. Just remember to do this tonight, not tomorrow morning, to avoid any uneven desiccation spots! 💡💎
Can a photographer just whiten my teeth in Photoshop instead?
While a photographer can retouch your smile, digital whitening often looks flat and lacks the natural translucency of real enamel. Over-edited teeth can fall into the "Uncanny Valley," making your headshot look less trustworthy on professional platforms like LinkedIn. Starting with a clean, bright base in real life ensures your smile looks authentic and three-dimensional even in RAW files.
Does whitening cause sensitivity that will make it hard to smile for a long shoot?
Modern formulas, like those developed by dental experts for GLI GLI, are specifically designed to provide a sensitive-free experience. If you use products with desensitizing agents or peroxide-free alternatives like PAP, you won't have to worry about zingers during your session. This keeps your facial muscles relaxed so you can smile widely and comfortably for hours in front of the camera. 💖🌿
What lipstick colours make teeth look whiter in photos?
Lipstick shades with blue undertones, such as berry reds, plums, and cool pinks, will make your teeth look significantly whiter. These cool tones contrast with and neutralize any remaining yellow in your enamel. Avoid warm oranges or corals, as these can emphasize yellowing and make even a bright smile look a bit dull under intense studio flash. 💄✨
Is it safe to use a whitening pen during a photoshoot break?
It is perfectly safe and highly effective to use a whitening pen during a shoot break for a quick brightness pop. Simply apply a thin layer, wait about 60 seconds for it to dry, and you're ready for your next setup. It's a fantastic way to refresh your smile if you've had a sip of coffee or just want that extra bit of on-camera sparkle. 🖋️🌟
How do I avoid getting white spots on my teeth right before a shoot?
To avoid temporary white spots, never use whitening products on the morning of your photoshoot. These spots are usually caused by temporary dehydration of the enamel and typically fade within a few hours. By finishing your last treatment the night before and staying well-hydrated, you'll ensure your smile looks perfectly even and radiant when the lights come on. 💧💎


