


What if the secret to a professional-grade glow isn't about how much gel you use, but exactly where you place it? Most people think more is better, but overfilling is the fastest way to irritated gums and wasted product. Learning how to apply teeth whitening gel in tray correctly shouldn't feel like a messy science experiment or a test of your pain tolerance.
I know how frustrating it is when that expensive gel leaks everywhere, causing that dreaded burning sensation instead of a beautiful smile. It's supposed to be a treat for yourself, not a chore! You deserve a process that feels as good as the results look. I promise that by the end of this guide, you'll be a pro at the "teardrop" method, achieving a radiant, even finish without any of the discomfort.
We're going to walk through the precise steps to get that perfect application every single time. From prepping your trays to the final reveal, you'll gain the confidence to transform your routine into a refreshing wellness ritual that truly shines. Let's get you that sparkle you've been dreaming of!
Key Takeaways
- Learn the professional 'teardrop' method to master exactly how to apply teeth whitening gel in tray for a flawless, mess-free finish. ✨
- Discover why surface prep is 50% of the battle and which specific products to avoid before your session to maximize your glow. 🧼
- Say goodbye to gum irritation by learning the precise placement technique that keeps the formula on your enamel and off your sensitive tissues. 💖
- Understand the "law of diminishing returns" and why a focused 15-30 minute session delivers better results than over-wearing your trays. ⏳
- Find out how precision-tip syringes and professional-grade ingredients can transform your whitening routine into a relaxing self-care ritual. 🌟
Mastering the Art of Teeth Whitening Gel Application
Have you ever wondered why some people get a blindingly beautiful smile while others end up with sore, irritated gums? It is all in the technique! Mastering how to apply teeth whitening gel in tray is the secret sauce that turns a basic routine into a professional-level transformation. When you apply the gel correctly, it stays exactly where it belongs: on your enamel. This ensures the active ingredients can penetrate deep to break down stubborn stains without bothering your sensitive soft tissues. If you want to nerd out on the details, you can find a comprehensive overview of teeth whitening that explains how these formulas interact with tooth structure. It is amazing how a few tiny adjustments can lead to such a massive difference in your results!
Think of your whitening session as more than just another item on your to-do list. It is a 20-minute self-love ritual! Put on your favorite chill playlist, light a scented candle, or finally start that podcast you’ve been eyeing. You aren't just bleaching your teeth; you are investing in your own confidence and radiance. The goal is simple: total, even coverage on the front of your teeth with absolutely zero contact on your gums. It is all about working smarter, not harder. When you treat this time as a kényeztető (pampering) experience, you'll actually look forward to your daily glow-up. ✨
Why Precision Matters: Gel vs. Gums
Whitening gel is a total powerhouse for enamel, but it is definitely not a friend to your gums. When you overfill a tray, that excess gel gets squeezed out the top and sits on your soft tissue. This often causes what pros call "blanching." That is that temporary white, stinging sensation that can really ruin your vibe. It is totally avoidable! Adopting a "less is more" philosophy ensures you get the brilliant results you want without any of the "ouch." Small, precise dots are your absolute best friend here. You want the gel to hug the teeth, not flood the mouth!
Setting Your Glow-Up Intentions
Modern at-home teeth whitening kits have come a long way. They are designed to be sleek, easy, and incredibly effective for the busy, modern woman. When you approach your whitening with intention, you'll notice the psychological boost that comes with a brighter smile. It’s about that inner radiance reflecting on the outside. You are taking control of your self-care, and that is a powerful feeling! Every session is a step closer to that magnetic, confident version of yourself. 💖
Pre-Whitening Prep: Setting the Stage for Maximum Brightness
Imagine trying to apply a gorgeous lip gloss over dry, flaky lips. It just doesn't work, right? The same logic applies to your smile. If you are learning how to apply teeth whitening gel in tray like a pro, you have to start with a clean canvas. Surface prep is easily 50% of the work. If there is plaque, food debris, or even just a layer of film on your teeth, the gel simply can't do its job properly. You want that formula to hug your enamel directly, not fight through a barrier. Before you even touch the gel, gather your essentials: your whitening tray, the gel syringe, a mirror, and a single cotton bud for any quick clean-ups.
Check your trays carefully before you begin. They should be completely free of any old gel or moisture from previous sessions. Even a tiny drop of water can mess with the formula's potency and cause it to slide around. It’s all about the details! When you take the time to set the stage properly, you are telling yourself that your self-care matters. It turns a quick task into a deliberate beauty investment that yields much better results. Having everything ready in front of a well-lit mirror makes the process feel calm and organized rather than rushed.
Brushing and Flossing: The Deep Clean
Timing is everything! I recommend brushing your teeth about 30 minutes before you start your session. This gap allows your gums to recover from the physical action of brushing, which significantly reduces the chance of any tingling or sensitivity. The ADA provides an authoritative and evidence-based perspective on how maintaining oral health is the foundation for any safe cosmetic treatment. Skip the heavy fluoride or specialized "desensitizing" toothpastes right before whitening, as they can sometimes seal the pores of your teeth too well. Instead, use a soft bristle toothbrush to keep things calm and comfortable. And please, don't skip the floss! Flossing ensures the gel can reach the sides of your teeth, preventing those annoying yellow borders that ruin a uniform glow.
The Dry Canvas: The Secret to Adhesion
Saliva dilutes whitening gel and prevents it from sticking to the enamel. This is the secret step most people miss! To get the best results, take a clean tissue and gently pat the front surfaces of your teeth dry right before inserting the tray. It might feel a bit funny, but it makes a world of difference for gel adhesion. You also need to make sure the tray itself is bone-dry. When you know how to apply teeth whitening gel in tray on a perfectly dry surface, the results are much more consistent and vibrant. If you're ready to start your journey, the GLI GLI whitening experience is designed to make this whole process feel like a breeze.
Step-by-Step: How to Apply Teeth Whitening Gel in Your Tray
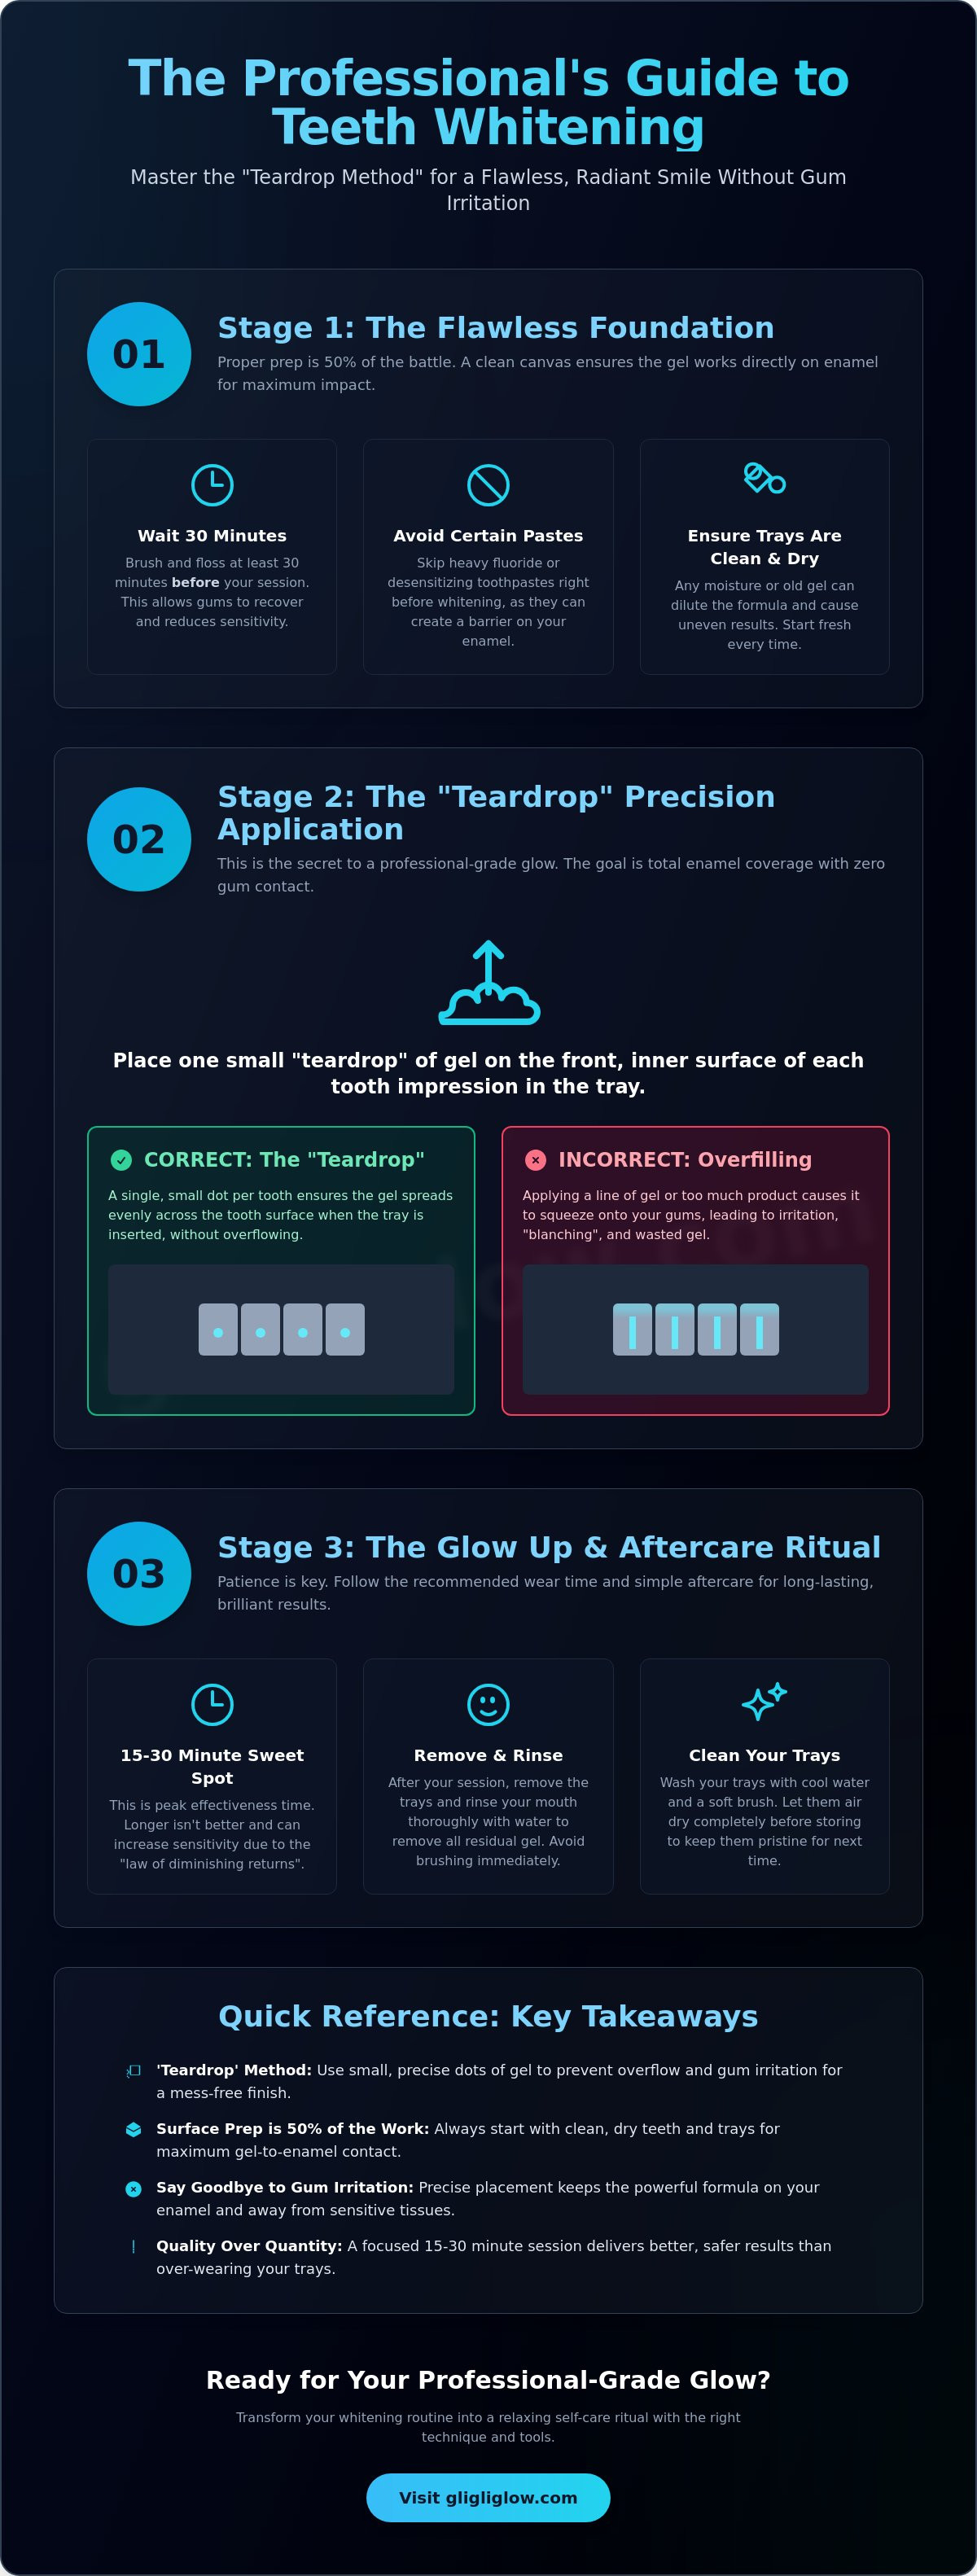
Now that your teeth are bone-dry and your "clean canvas" is ready, it is time for the main event! Learning how to apply teeth whitening gel in tray correctly is what separates a frustrating experience from a professional-level glow-up. Forget those old-school tutorials that show people squeezing a long, continuous line of gel into the tray. That method is wasteful and almost guarantees the gel will leak onto your gums. Instead, we are going to use a much more sophisticated approach that ensures every drop of your formula works exactly where it should. It is all about precision and a little bit of patience. ✨
Before you start, take a look at your tray in the mirror. You want to visualize the placement of the gel. The secret is to aim for the center of the front wall of each tooth mold. When you eventually press the tray against your teeth, the gel will spread out to cover the entire surface. If you put the gel at the very bottom or the very top, it won't distribute evenly. Trust the process! This method keeps your routine clean, efficient, and totally stress-free. It is your time to shine, so let's get those dots perfectly placed. 🌟
The Teardrop Technique: Less is More
- Step 1: Gently press the syringe to place a tiny dot, about the size of a pinhead, for each tooth. Think of it as a delicate teardrop of radiance!
- Step 2: Only apply this dot to the front-facing side of the tray. Your molars in the back don't need whitening, so don't waste your precious gel where no one will see it.
- Step 3: Focus primarily on your "social six." These are the teeth that are most visible when you smile and laugh. Focusing your energy here ensures the most impactful results for your radiant new look. 💖
Inserting the Tray and Managing Excess
When you are ready to insert the tray, use a slight tilt to avoid smearing the gel on your lips. Once it is in place, give the tray a firm but gentle press against your teeth. This distributes those tiny teardrops into a thin, even layer across your enamel. If you see a little bit of gel oozing over the top, don't panic! Grab that dry cotton bud you prepared earlier and immediately wipe away any excess from your gums. You want to keep that soft tissue clear to avoid any tingling. Never swallow the excess gel; it is meant for your teeth, not your tummy! If you feel some extra saliva building up, just spit it out. Finish with a quick mirror check to ensure every "smile tooth" is perfectly covered. You’re doing amazing! 🌈
The Waiting Game: Wear Time and Aftercare Rituals
Your trays are comfortably in place, and the timer is ticking! Now that you have successfully navigated how to apply teeth whitening gel in tray, you can sit back and relax. This waiting period is where the transformation really happens. For most modern, high-quality kits, the ideal wear time is between 15 and 30 minutes. This is the peak window for the active ingredients to lift those deep-set stains. While some older guides might suggest wearing trays for several hours, modern science tells us that shorter, more frequent sessions are much kinder to your enamel. It is all about efficiency, not endurance!
Why not turn these 20 minutes into a dedicated wellness ritual? You could apply a hydrating face mask, catch up on your favorite podcast, or even spend a few minutes in mindful meditation. When your timer finally signals the end, it is time for the "Post-Glow" rinse. Gently remove your trays and rinse your mouth thoroughly with lukewarm water. Make sure to clean your trays immediately with a soft toothbrush and cool water. Keeping your tools pristine is a vital part of your self-care routine, ensuring everything is ready for your next kényeztető (pampering) session. 💖
How Long to Leave the Gel in Your Trays
The duration of your session depends on the specific formula you are using. Hydrogen peroxide formulas generally work faster than carbamide peroxide, which is why modern kits are so incredibly time-efficient. When you stay consistent with how to apply teeth whitening gel in tray, you'll see a beautiful, natural-looking lift without the stress of marathon sessions. If you ever feel sharp, temporary sensations known as "zingers," it is your body's way of saying it's time to wrap things up. Listen to your teeth! Consistency is always more effective than intensity. A daily, comfortable session for a week will give you a much more stable and radiant result than one long, painful session. ⏳
Post-Whitening Sensitivity Hacks
Your enamel is a little more porous right after a session, so treat your smile with extra love. Always use lukewarm water for rinsing; ice-cold or boiling water can shock your teeth and cause unnecessary stinging. For the next 24 hours, I recommend following the "White Diet." This means avoiding anything that could stain a white t-shirt, such as coffee, red wine, soy sauce, or dark berries. To keep your results looking fresh and vibrant, you can use a gentle whitening toothpaste for daily maintenance. If you're ready to keep that sparkle alive, you can find our GLI GLI Teeth Whitening Gel Refills to ensure you never run out of your favorite glow-booster! 🌈
Why the GLI GLI Teeth Whitening Kit Makes Application Foolproof
You’ve mastered the technique, you’ve prepped your canvas, and you know the rules of the waiting game. Now, let’s talk about the tools that make this whole process feel like a luxurious spa day rather than a dental appointment. The real secret to why our community loves the GLI GLI experience is that we’ve designed every single component to solve the common "messy" problems. When you are figuring out how to apply teeth whitening gel in tray, the last thing you want is a clunky syringe that squirts out way too much product. That is why our syringes feature ultra-precise tips. They allow you to place that perfect, pinhead-sized teardrop exactly where you need it, every single time. No waste, no mess, just pure radiance! 💖
We also know that many "glow-getters" worry about sensitivity. Our dental-grade formula is specifically crafted to be gentle on your enamel while still packing a punch against stains. Plus, let’s be honest: aesthetics matter! The kit looks absolutely stunning on your vanity, making it a piece of decor you’ll actually want to show off. It turns your daily routine into a visual treat that sparks joy before you even start whitening. It is all about creating a seamless, beautiful experience from the moment you open the box. 🌟
Dental-Grade Gel Meets Smart LED Tech
The GLI GLI LED Whitening Device is the real MVP of your routine. It doesn't just sit there; it actively works to accelerate the whitening process by activating the gel's ingredients. This means you get those 7-shade brighter results much faster than with traditional trays alone. One of the best parts? The built-in timer! You can totally lose yourself in a book or a meditation session without constantly checking your phone. The device handles the "clock-watching" for you. We take your safety seriously too. Our formula uses FDA and ISO-approved ingredients, giving you total peace of mind while you level up your smile. It is professional power, simplified for your home. ✨
Everything You Need for a Seamless Routine
We’ve made sure you don't have to hunt for extra tools. Everything is right there in the GLI GLI Teeth Whitening Kit to make learning how to apply teeth whitening gel in tray a total success. Inside, you’ll find our high-potency gel syringes, the universal-fit trays, the powerful LED device, and a handy results guide to track your progress. We are so confident you’ll love your new look that we offer a "Glow Guarantee." We stand by our results because we know how much a confident smile can change your whole vibe. Don't wait for a special occasion to feel your best. Start your journey to a brighter, more magnetic smile today and let your inner light shine through! 🌈
Ready to Unleash Your Most Magnetic Smile?
You are officially ready to turn your smile into your most powerful accessory! Mastering how to apply teeth whitening gel in tray is about more than just aesthetics; it is about reclaiming your confidence through a mindful self-care ritual. Remember to always start with a bone-dry canvas and use the precision teardrop technique to keep those gums happy and healthy. By focusing on consistency and following the right aftercare, that radiant glow you've been dreaming of is finally within reach. It is amazing how such small, simple steps can lead to a total transformation!
Why settle for anything less than professional perfection? Our formula was designed by dental experts to ensure zero sensitivity, using only FDA and ISO-approved ingredients for your peace of mind. We are so sure you'll love the results that we even offer a 7-shade brighter guarantee! It is time to treat yourself to the kényeztető experience you deserve. You have the knowledge and the tools to sparkle, so go ahead and show the world that beautiful, confident smile!
Get Your Professional GLI GLI Whitening Kit Now!
Frequently Asked Questions
How much gel should I put in my whitening tray?
You should only use a tiny dot of gel, roughly the size of a pinhead, for each tooth. It is a common mistake to think more gel equals faster results, but overfilling actually causes messy leakage. By mastering how to apply teeth whitening gel in tray with the teardrop method, you ensure the formula stays on your enamel. One syringe should last for several sessions since you only need to cover your visible "smile teeth." ✨
What happens if the whitening gel touches my gums?
It might cause temporary stinging or tiny white spots on your gums called "blanching," but please don't panic! Simply use a dry cotton bud or a clean tissue to wipe away any excess gel immediately. This is exactly why precision is so important during your application. If the irritation feels uncomfortable, just shorten your session time or take a break for a day to let your soft tissues recover completely. 💖
Can I leave the whitening gel in my tray overnight?
No, you should definitely stick to the recommended 15 to 30 minute wear time for modern whitening kits. Leaving gel in overnight doesn't necessarily mean whiter teeth; it usually just leads to extreme sensitivity and gum irritation. Modern formulas are designed to be fast-acting and efficient. Once the active ingredients have done their job, keeping the trays in longer offers diminishing returns and unnecessary discomfort for your enamel. ⏳
Should I brush my teeth immediately after removing the whitening trays?
It is much better to rinse with lukewarm water first and wait about 30 minutes before you start brushing. Your enamel is slightly more sensitive right after a whitening session, so giving it a little breathing room is a great kényeztető (pampering) move. When you finally do brush, use a soft-bristled brush to keep things gentle. This helps protect your gorgeous new glow while keeping your teeth healthy and strong. 🧼
How many days in a row should I apply the gel?
Most people see incredible, lasting results by using their kit for 7 to 10 consecutive days. Consistency is the real secret to a vibrant smile that truly pops! If you feel any sensitivity along the way, it's totally okay to skip a day. Your journey to a 7-shade brighter smile is a marathon, not a sprint. Once you reach your desired shade, you can switch to simple weekly maintenance sessions. 🌈
Does the gel go on the front or back of the teeth in the tray?
The gel only needs to go on the front-facing wall of the tray. Since the goal is to brighten the teeth people see when you smile, putting gel on the back is just wasting your favorite product. When you are practicing how to apply teeth whitening gel in tray, focus on the center of the front wall for each tooth. This keeps your routine clean and ensures your gel refills last much longer! 🌟
What should I do if I have leftover gel in the syringe?
Simply replace the cap tightly on the syringe and store it in a cool, dry place away from direct sunlight. You definitely don't need to use the whole syringe in one go! Keeping the cap secured prevents the formula from oxidizing, so it stays fresh and potent for your next self-care ritual. It’s all about being mindful with your beauty investments and making sure your products stay in top-tier condition. 🌸
Can I use the gel without the LED light device?
Yes, the gel will still work on its own, but the LED device is designed to accelerate the process for much faster results. The blue light helps activate the whitening agents, making your 20-minute session significantly more effective. If you're in a rush or want that maximum glow-up, using the integrated LED is definitely the way to go. It secures the tray in place and handles all the timing for you! ⚡


