


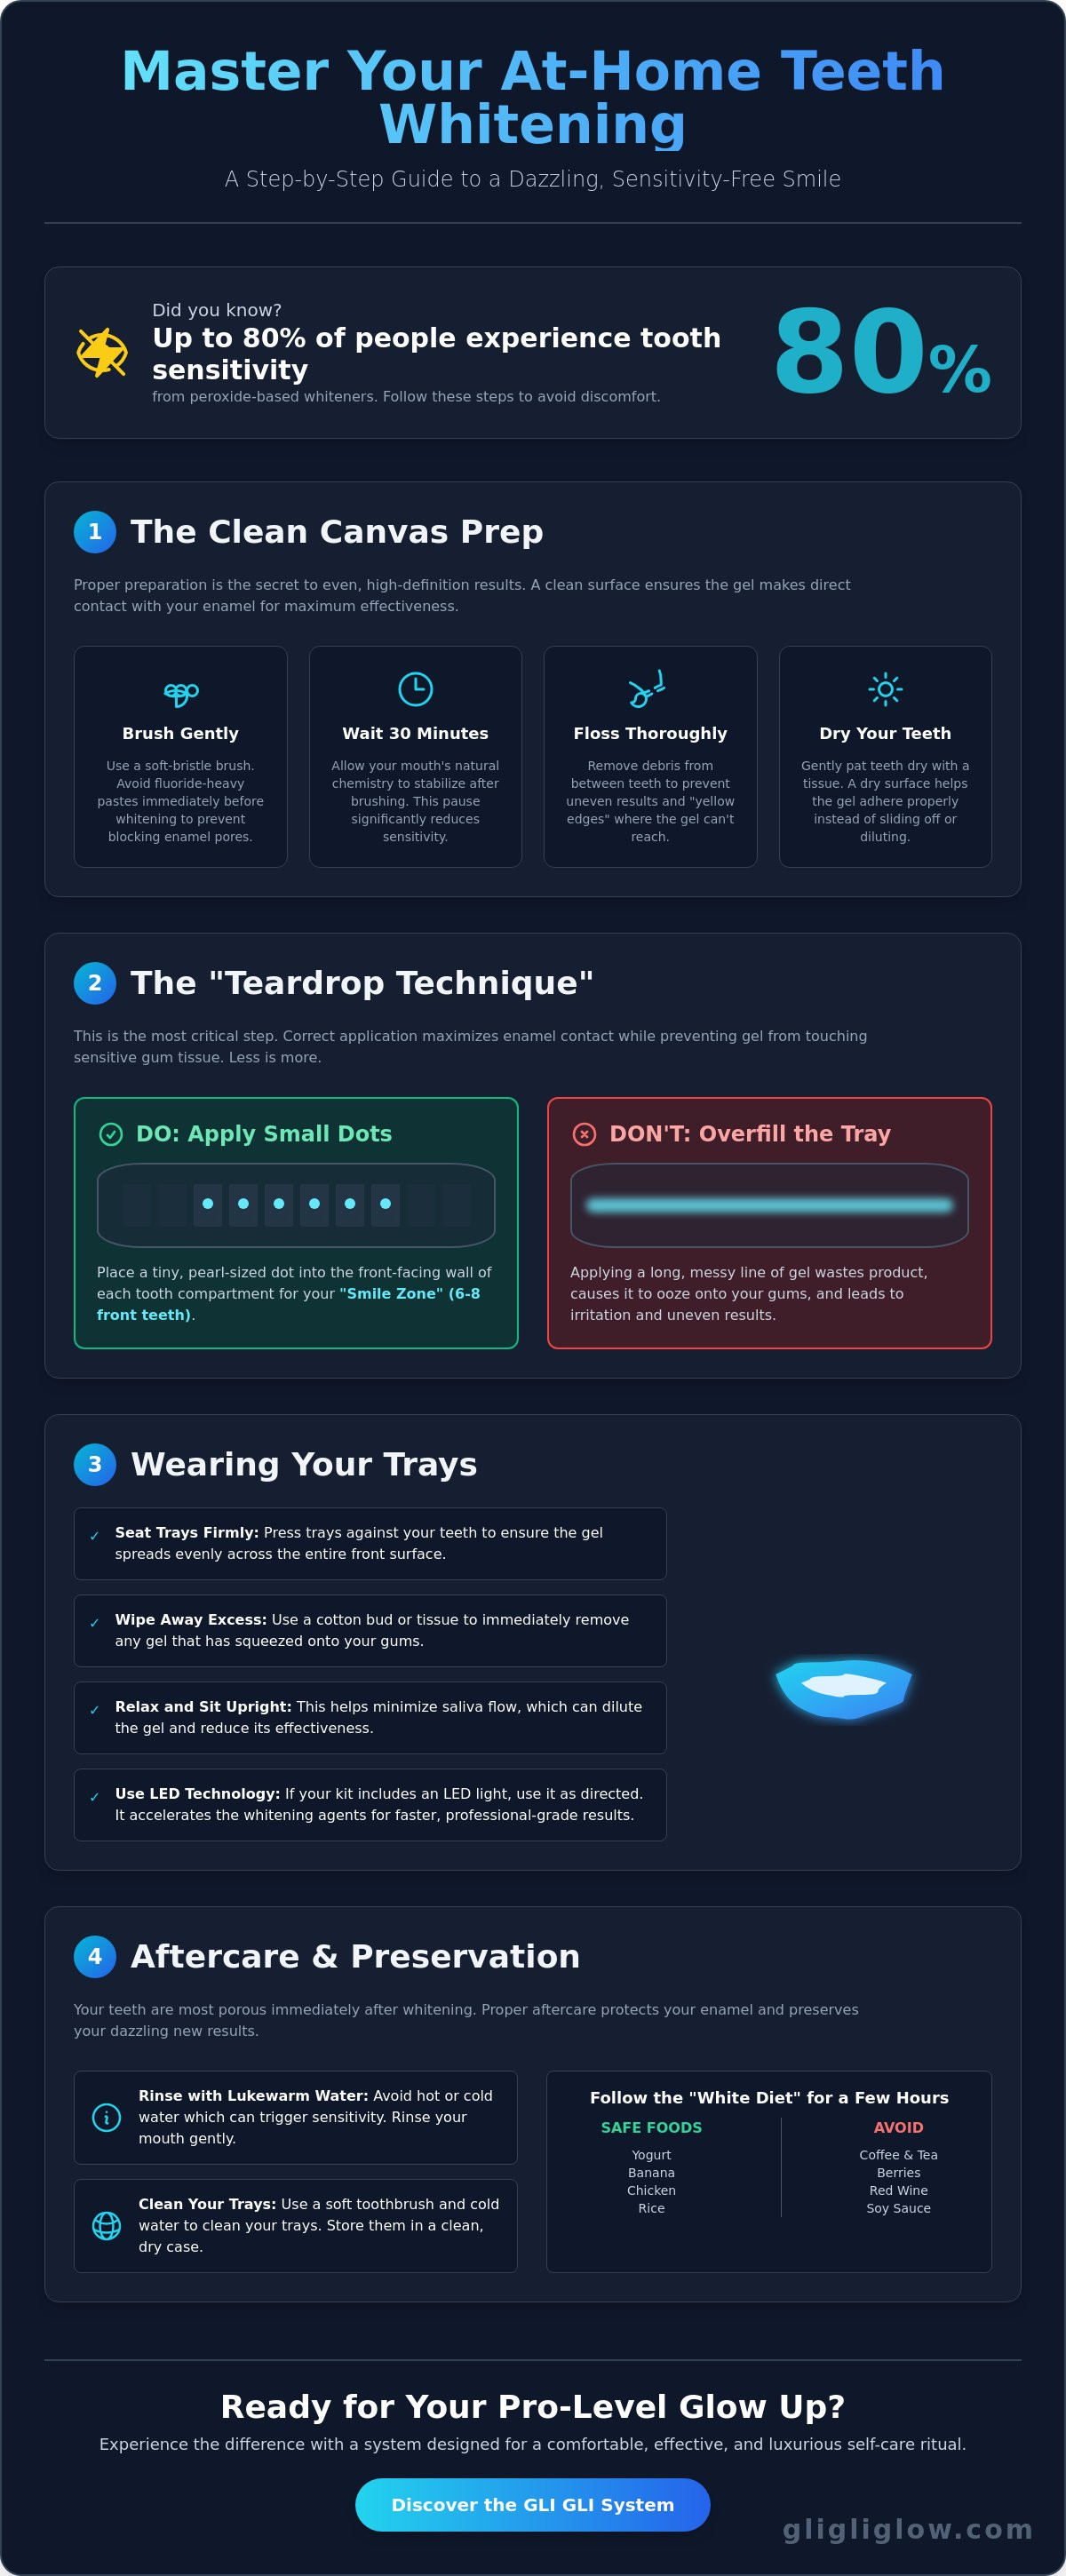
Did you know that up to 80% of people experience temporary tooth sensitivity after using peroxide-based whiteners? It's the biggest reason many of us hesitate to start our glow-up journey or research how to use a teeth whitening tray correctly. We've all felt that nervous flutter while staring at a whitening syringe, wondering if we're about to get a brilliant smile or a literal burning sensation on our gums. You want those pearly whites, but you definitely don't want to waste expensive product or end up with patchy, uneven results that don't match your vibe.
This process shouldn't feel like a high-stakes science experiment. It should be a refreshing, indulgent part of your weekly self-love routine. We're here to help you master the "less is more" ritual for a professional, sensitivity-free finish that feels as good as it looks. In this guide, we'll walk you through every step to ensure your gel stays exactly where it belongs and your inner confidence truly shines through. Get ready to unlock a noticeably brighter, dazzling smile without any of the discomfort. ✨
Key Takeaways
- Discover the "clean canvas" secret and why waiting 30 minutes after brushing is the ultimate pro-move for perfectly even results. 🧼
- Master the "Teardrop Technique" to learn exactly how to use a teeth whitening tray without wasting gel or irritating your gums. ✨
- Navigate 2026 timing guidelines to keep your trays seated properly for a comfortable, saliva-free whitening experience. ⏳
- Protect your enamel with gentle removal hacks and lukewarm water rinses that preserve your dazzling new brightness. 💎
- Elevate your routine with LED-integrated technology that delivers professional-grade results as a luxury self-care ritual. 💖
Pre-Whitening Ritual: Prepping Your Smile for Maximum Glow
Think of your teeth as a masterpiece in progress. Before you even think about how to use a teeth whitening tray, you need the perfect base. In the dental world, the process of lightening the colour of human teeth depends entirely on the whitening gel making direct contact with your enamel. If there's a film of plaque or yesterday's iced latte in the way, your results will be patchy at best. A "clean canvas" isn't just a suggestion; it's the secret to that high-definition radiance you're after. ✨
Timing is everything. One of the biggest mistakes people make is jumping straight from brushing to whitening. We call this the 30-minute rule. Brushing, even with a gentle touch, can leave your gums slightly sensitized and open the micro-channels in your teeth. By waiting half an hour, you allow your mouth's natural chemistry to stabilize. This small pause significantly reduces the risk of those annoying "zings" of sensitivity that can ruin your self-care vibe.
Don't forget the hidden spots! Flossing is your secret weapon against "yellow edges." If the gel can't reach between your teeth because of debris, you'll end up with a bright front and dark borders. Finally, grab a tissue and dry your teeth. Moisture is the ultimate enemy of peroxide. When your teeth are dry, the gel stays exactly where you put it instead of sliding off or getting diluted by saliva. It's a simple step that makes a massive difference in how the formula penetrates.
The Clean Canvas Checklist
- Use a soft bristle toothbrush to keep things gentle and avoid micro-irritation to your gums.
- Skip the fluoride-heavy pastes immediately before whitening. Heavy fluoride can actually block the pores of your teeth, making it harder for the gel to do its job effectively.
- Ensure no food debris is trapped in the interdental spaces. A quick check in the mirror saves you from uneven spots later!
Setting the Scene for Your Glow-Up
Make it a ritual, not a chore. When you're learning how to use a teeth whitening tray for the first time, prepping your environment is just as vital as the application itself. Gather your kit, a clear mirror, and a few cotton buds for quick cleanup. Check your GLI GLI gel expiration date; fresh gel means fresh results. Since your enamel will be "thirsty" for several hours after the session, prep a "white diet" snack like plain yogurt or a banana. Having this ready prevents you from reaching for staining foods like coffee or berries while your teeth are most vulnerable. 💖
The Perfect Pour: How to Load Your Whitening Trays Like a Pro
Loading your tray is the most critical part of the entire process. It is the difference between a radiant transformation and a literal headache. If you have ever struggled with how to use a teeth whitening tray, you know the frustration of keeping that gel exactly where it needs to be. The goal is simple: maximize contact with the enamel while keeping the soft tissue completely dry. Precision is your best friend here, and a steady hand goes a long way toward achieving that professional finish.
The "Teardrop Technique" is the gold standard for 2026. Instead of a long, messy line of gel, you want to place a tiny, pearl-sized dot, about the size of a match head, into the front-facing wall of each tooth compartment. This ensures the gel spreads evenly across the surface as you press the tray against your teeth. While dentist-supervised whitening approaches traditionally rely on custom-molded plastic, modern universal trays in kits are designed to be more flexible. Whether your tray is custom or part of a high-tech LED system, the rule is the same: less is always more.
Focus your energy on the "Smile Zone." These are the six to eight teeth that show when you talk or laugh. Whitening your back molars is usually a waste of time and product. It also increases the chances of gel slipping toward your throat, which is never a pleasant experience. Keep your focus on the front, and your results will look professional every time. If you find you are running through your supply too fast, it is a sign you are overfilling. You can always grab GLI GLI Teeth Whitening Gel Refills to keep your routine consistent without missing a beat. ✨
Step-by-Step Gel Application
- Place a small dot of gel on the front wall of the tray, not the bottom. This ensures it hits the face of the tooth immediately upon insertion.
- Aim for the middle-to-lower third of each tooth compartment. As you bite down, the gel will naturally rise to cover the rest of the tooth surface.
- Stop at the premolars. Most people only need to whiten the front six to ten teeth for a full, dazzling glow-up.
Troubleshooting Gel Overflow
Even pros make a mess sometimes. If you see gel squeezing out onto your gums, do not panic. Use a dry cotton bud to gently wipe away the excess immediately. This simple hack prevents the burning sensation often associated with peroxide touching soft tissue. Signs you have used too much gel include a soapy taste in your mouth or visible white spots on your gums. A properly loaded tray should feel secure and "dry" on the outside, with all the magic happening strictly on your enamel. 💖
The Glow-Up Window: Wearing Your Trays Comfortably and Safely
Once you have mastered how to use a teeth whitening tray and popped them into place, your personal spa session officially begins. This is your "glow-up window," a dedicated time for self-care where the magic happens. It is not just about waiting for a timer to go off; it is about ensuring the environment inside your mouth stays perfect for the gel to work its wonders. Keep those trays securely seated by avoiding heavy talking or exaggerated facial expressions. If you feel a tray shifting, simply give it a gentle tap on the front to ensure the gel is flush against your enamel. You might notice your mouth producing extra saliva, and that is totally normal! It is perfectly fine to swallow small amounts of saliva, but try to avoid gulping to keep the whitening formula concentrated exactly where it belongs. ✨
Your comfort is the absolute priority during this ritual. While we all want instant results, pushing through pain is never the answer. Keep a close eye on how your teeth feel. If you experience a sharp "zing" or persistent discomfort, it is a sign to listen to your body and cut the session short. Consistency over several days will always deliver a better, safer result than one painful, over-extended session. Use this time to lean into the experience. Whether you are catching up on a podcast, planning your next big move, or practicing mindfulness, make this 30-minute window a moment of true önszeretet (self-love). 💖
Understanding Wear Times
Timing is everything when it comes to chemical concentrations. Hydrogen Peroxide (HP) is the "express" choice, typically requiring only 15 to 30 minutes to deliver a punch of brightness. Carbamide Peroxide (CP) breaks down more slowly, making it the preferred option for longer sessions or even overnight wear for those with busy schedules. Remember the law of diminishing returns: longer does not always mean whiter. Once the active ingredients have finished their reaction, extra wear time only increases the risk of sensitivity without adding extra glow. Stick to the 2026 guidelines provided with your GLI GLI kit for the best balance of speed and safety.
Maximizing Comfort and Results
To get the most out of every minute, keep your mouth movements to a minimum. Talking too much can break the seal of the tray, allowing saliva to seep in and dilute the gel. Instead, treat this as your "quiet time." If you are using a universal tray, ensuring it stays flush against the teeth is key. A quick, gentle press with your fingers across the front of the tray after insertion helps the gel spread into every curve of your smile. This simple habit ensures an even, professional-looking result every single time you whiten. ✨
Aftercare Magic: Cleaning Your Trays and Preserving Your Results
The hard part is over! You have successfully navigated how to use a teeth whitening tray, and now it is time to reveal that fresh, bright smile. Removing your trays should be a gentle process. Don't yank them. Instead, start from the back and slowly peel them away from your teeth to protect your enamel. Once they are out, head straight to the sink for a lukewarm water rinse. Why lukewarm? Cold water can be a shock to newly whitened teeth, and hot water is a no-go for the trays themselves. This simple rinse removes any leftover gel and feels incredibly refreshing. ✨
Maintaining your results is just as important as the whitening session itself. Your teeth are slightly more porous right after treatment, meaning they act like a sponge for stains. This is where the "White Diet" comes in. For at least the next 24 to 48 hours, try to avoid anything that would stain a white t-shirt. We are talking about coffee, red wine, soy sauce, and turmeric. Stick to clear liquids and light-colored foods to lock in that radiance. Drinking plenty of water also helps keep your mouth hydrated and washes away potential staining agents before they can settle. 💧
Cleaning and Storing Your Equipment
Your trays need love too! Understanding how to use a teeth whitening tray properly involves caring for the hardware. After every use, grab a soft toothbrush and some cool water. Gently scrub the inside to remove any residual gel or saliva. Never use toothpaste on your trays. The abrasive particles in toothpaste can create tiny scratches where bacteria love to hide. Avoid hot water at all costs, as it can warp the material and ruin that perfect fit you worked so hard to achieve. Let them air-dry completely before snapping them back into their case. Proper hygiene ensures your kit stays fresh and ready for your next session. 🧼
Protecting Your New Glow
Consistency is the key to a long-lasting dazzle. While the initial results are exciting, daily life can be tough on enamel. If you find yourself reaching for a latte, consider using an at-home teeth whitening kit for quick monthly touch-ups. This keeps your smile at its peak brightness year-round. Remember the 48-hour rule for high-pigment foods to ensure your enamel has time to "seal" properly. Ready to keep that momentum going? Grab your GLI GLI LED Whitening Device and stay ahead of the stains! 💖
Why the GLI GLI System Reinvents the Traditional Tray Experience
You have already mastered the technical side of how to use a teeth whitening tray, but the technology you choose is what truly defines your results. Most traditional systems rely on static plastic trays that can feel bulky or uncomfortable. We decided to change the game. By combining ergonomic design with cutting-edge light therapy, the GLI GLI system transforms a basic dental procedure into a vibrant self-care ritual. It is about more than just shades of white; it is about the confidence that comes from a professional-grade experience in the comfort of your own home. ✨
Our approach addresses the biggest pain points of at-home whitening: uneven results and messy applications. Because our trays are designed to fit the unique curves of your smile, the gel stays exactly where you put it during your "teardrop" application. This precision ensures that every tooth in your "Smile Zone" receives the same level of attention. We believe your glow-up should be as effortless as it is effective, allowing you to focus on the joy of your transformation rather than the mechanics of the process.
The Power of the LED Boost
Why wait longer than you have to? Our blue light technology interacts with the whitening gel to accelerate the oxidation process safely. This means you get deeper stain removal in a fraction of the time compared to old-school trays. We have even removed the stress of clock-watching with built-in timers that let you know exactly when your session is done. For the ultimate convenience, the GLI GLI LED device connects directly to your phone, making it easy to whiten while you scroll, work, or relax on the go. 📱
A Formula Built for You
Safety is the foundation of every dazzling smile. Our dental-grade formula is built around FDA-registered ingredients and adheres to the ISO 28399 consensus standard for external tooth bleaching. This ensures maximum results with minimal sensitivity, even for those who usually find peroxide products a bit "zingy." When you run low, our gel refills are the perfect companion to keep your tray system performing at its peak. We stand by your 2026 glow-up because we know that when you feel good about your smile, you shine from the inside out. 💖
Ready for your brightest smile yet? Grab your GLI GLI kit here!
Step Into Your Brightest Future Today
Mastering the art of the perfect smile is all about the ritual. You now have the professional secrets to prep your "clean canvas" and use the teardrop technique for a mess-free application. Learning how to use a teeth whitening tray shouldn't be a source of stress; it should be a refreshing part of your modern wellness routine. By focusing on the "Smile Zone" and committing to a quick aftercare window, you're ensuring that your results stay as vibrant as your personality. ✨
Our dental-expert developed formula is crafted with FDA and ISO approved ingredients to ensure your experience is as safe as it is effective. We believe in your glow-up so much that we back it with a 100% result guarantee. There's no reason to wait for the confidence you deserve. It's time to treat yourself to the premium care your smile has been waiting for.
Start your journey to a whiter smile with the GLI GLI Kit!
Your most radiant, dazzling self is ready to be seen. Keep glowing and stay magabiztos! 💖
Your Burning Glow-Up Questions Answered
How much gel should I put in each teeth whitening tray?
You only need a tiny amount, about the size of a match head or a small teardrop, for each tooth compartment. Focus on the front-facing wall of the tray so the gel stays on your enamel rather than squeezing onto your gums. Using too much gel doesn't speed up the process; it just leads to waste and potential irritation. ✨
Can I sleep with my teeth whitening trays in?
It depends entirely on the type of gel you are using. If your kit contains Carbamide Peroxide, it breaks down slowly and is often safe for overnight wear. However, Hydrogen Peroxide formulas are much faster and should only stay in for 15 to 30 minutes. Always check your specific GLI GLI instructions to ensure you aren't over-exposing your enamel while you dream. 🌙
What should I do if my gums start to burn while using the tray?
Stop your session immediately and rinse your mouth with lukewarm water. A burning sensation usually means gel has leaked onto your soft tissue. For your next session, use a smaller amount of gel and keep a cotton bud handy to wipe away any overflow instantly. Your comfort is the most important part of this self-love ritual! 💖
How long does it take to see results from whitening trays?
Most people notice a brighter vibe after just three to five days of consistent use. For a full transformation of two to eight shades, a complete 10 to 14-day cycle is usually recommended. Everyone's enamel is unique, so your personal glow-up timeline might vary slightly based on your starting shade and lifestyle habits. ✨
How do I clean my whitening trays after use?
Rinse your trays with cool water and use a soft toothbrush to gently scrub away any leftover gel. Avoid using toothpaste, as its abrasive texture can create tiny scratches that trap bacteria and dull the tray's clarity. Make sure they are completely air-dried before you snap them back into their storage case to keep everything fresh and hygienic. 🧼
Can I use whitening trays if I have fillings or crowns?
Yes, you can safely use them, but keep in mind that whitening gel only works on natural tooth structure. Fillings, crowns, and veneers won't change color. If you have dental work in your "Smile Zone," it's a good idea to chat with a professional to ensure your final results look even and seamless across your entire smile. 💎
How often should I use my whitening trays for the best results?
For your initial treatment, use them once daily for seven to 14 consecutive days. Once you've reached your desired level of brightness, a single maintenance session once a month is usually enough to keep stains at bay. Over-whitening can lead to sensitivity, so listen to your teeth and give them breaks when they need it! ⏳
Why are my teeth sensitive after using the whitening tray?
Sensitivity happens because the peroxide temporarily opens the microscopic pores in your enamel to lift deep stains. This is a normal part of learning how to use a teeth whitening tray and usually fades within 24 hours. Using a desensitizing gel or skipping a day between treatments can help keep your experience pain-free and enjoyable. 💖


