


What if looking camera-ready has less to do with changing your teeth and more to do with feeling comfortable on screen? Seeing your own face during a call can make you fixate on tiny details, while harsh lighting or an awkward angle can change how your smile appears. You’re not imagining it, and you don’t need a rushed makeover to feel prepared.
These zoom-ready smile tips will help you look relaxed and polished with a few simple adjustments before your next call. We’ll cover lighting, camera position and easy ways to check your video, along with habits that help your smile feel natural instead of posed. If you’d like a brighter-looking smile, you’ll also find a practical way to plan ahead and treat at-home whitening as part of a routine, not a same-day fix. Use this checklist to get set, take a breath and let your real smile shine.
Key Takeaways
- Use these zoom-ready smile tips to create a comfortable, natural expression instead of holding a fixed grin.
- Preview your setup in order: choose your light, position the camera, frame your face, then check the result.
- Prepare in stages, with a camera and lighting test before the meeting and a quick final check before joining.
- Relax your jaw and practise your opening line to help your smile feel more at ease on camera.
- If a brighter smile is part of your plan, GLI GLI states that results may be visible in 5-10 days. Whitening is optional, not a last-minute fix.
Why a Zoom-Ready Smile Starts With Feeling Like Yourself
A Zoom-ready smile isn’t a fixed grin or a flawless set of teeth. It’s an expression that feels comfortable, natural and right for the conversation. You might choose a bright, polished smile for a presentation or a softer look for a catch-up with a friend. The goal is to show up as yourself, not perform for the little preview window.
Seeing your own face while you speak can make familiar details feel oddly unfamiliar. You may notice how your mouth moves or how your smile looks between words. That doesn’t mean anything is wrong with your smile. Set one realistic aim for the call: feel relaxed, look polished or get more comfortable seeing yourself on screen. One clear goal is kinder and more useful than trying to fix every detail at once.
What does camera-ready mean for your call?
Let the occasion guide your approach. A client presentation may call for a composed expression; a job interview might feel best with a warm greeting and a natural smile. For a casual catch-up, comfort can take the lead, while a virtual celebration may invite a little extra sparkle in your expression. There’s no single camera-ready standard. Choose what feels authentic for the people you’re meeting.
Copying a posed photo can make your expression feel stiff. Instead, think about how you’d greet someone in person. Facial expressions, including smiles, are part of how people communicate without words, as this overview of facial expression explains. Let your expression move naturally as you listen and speak.
Why can your smile look different on Zoom?
Your video preview shows your face within a particular frame and under the light in your room. A close crop may draw your attention to details you’d barely notice in person. Dim, uneven or strong light can also change how your face and smile appear on screen. Those are features of the preview, not proof that your smile itself has changed.
Use the self-view as a practical check, not an objective assessment. Ask, “Can I see my face clearly?” rather than zooming in on tiny details. If something looks off, adjust the room light or camera framing before judging your smile. A small setup change may be all you need to make the image feel more like you.
Camera readiness is about feeling present and comfortable, not achieving a perfect smile. Before your next call, choose the aim that fits:
- Relaxed: Prioritise ease over posing.
- Polished: Choose a composed expression that suits the meeting.
- Camera-comfortable: Treat the preview as a setup tool, then focus on the conversation.
That simple intention gives your zoom-ready smile tips a personal starting point. You’re preparing to connect, not auditioning for a still photo. Let your expression respond to the moment, and give yourself permission to look like yourself.
Set Up Your Zoom Camera and Lighting for a Clearer Smile
A few small setup tweaks can make your video look clearer and more comfortable without special equipment. Make the changes in order so you can tell what helps: light first, camera position next, framing after that, then a final preview. These zoom-ready smile tips improve the image on screen, not your smile itself.
Try this simple sequence before the meeting begins:
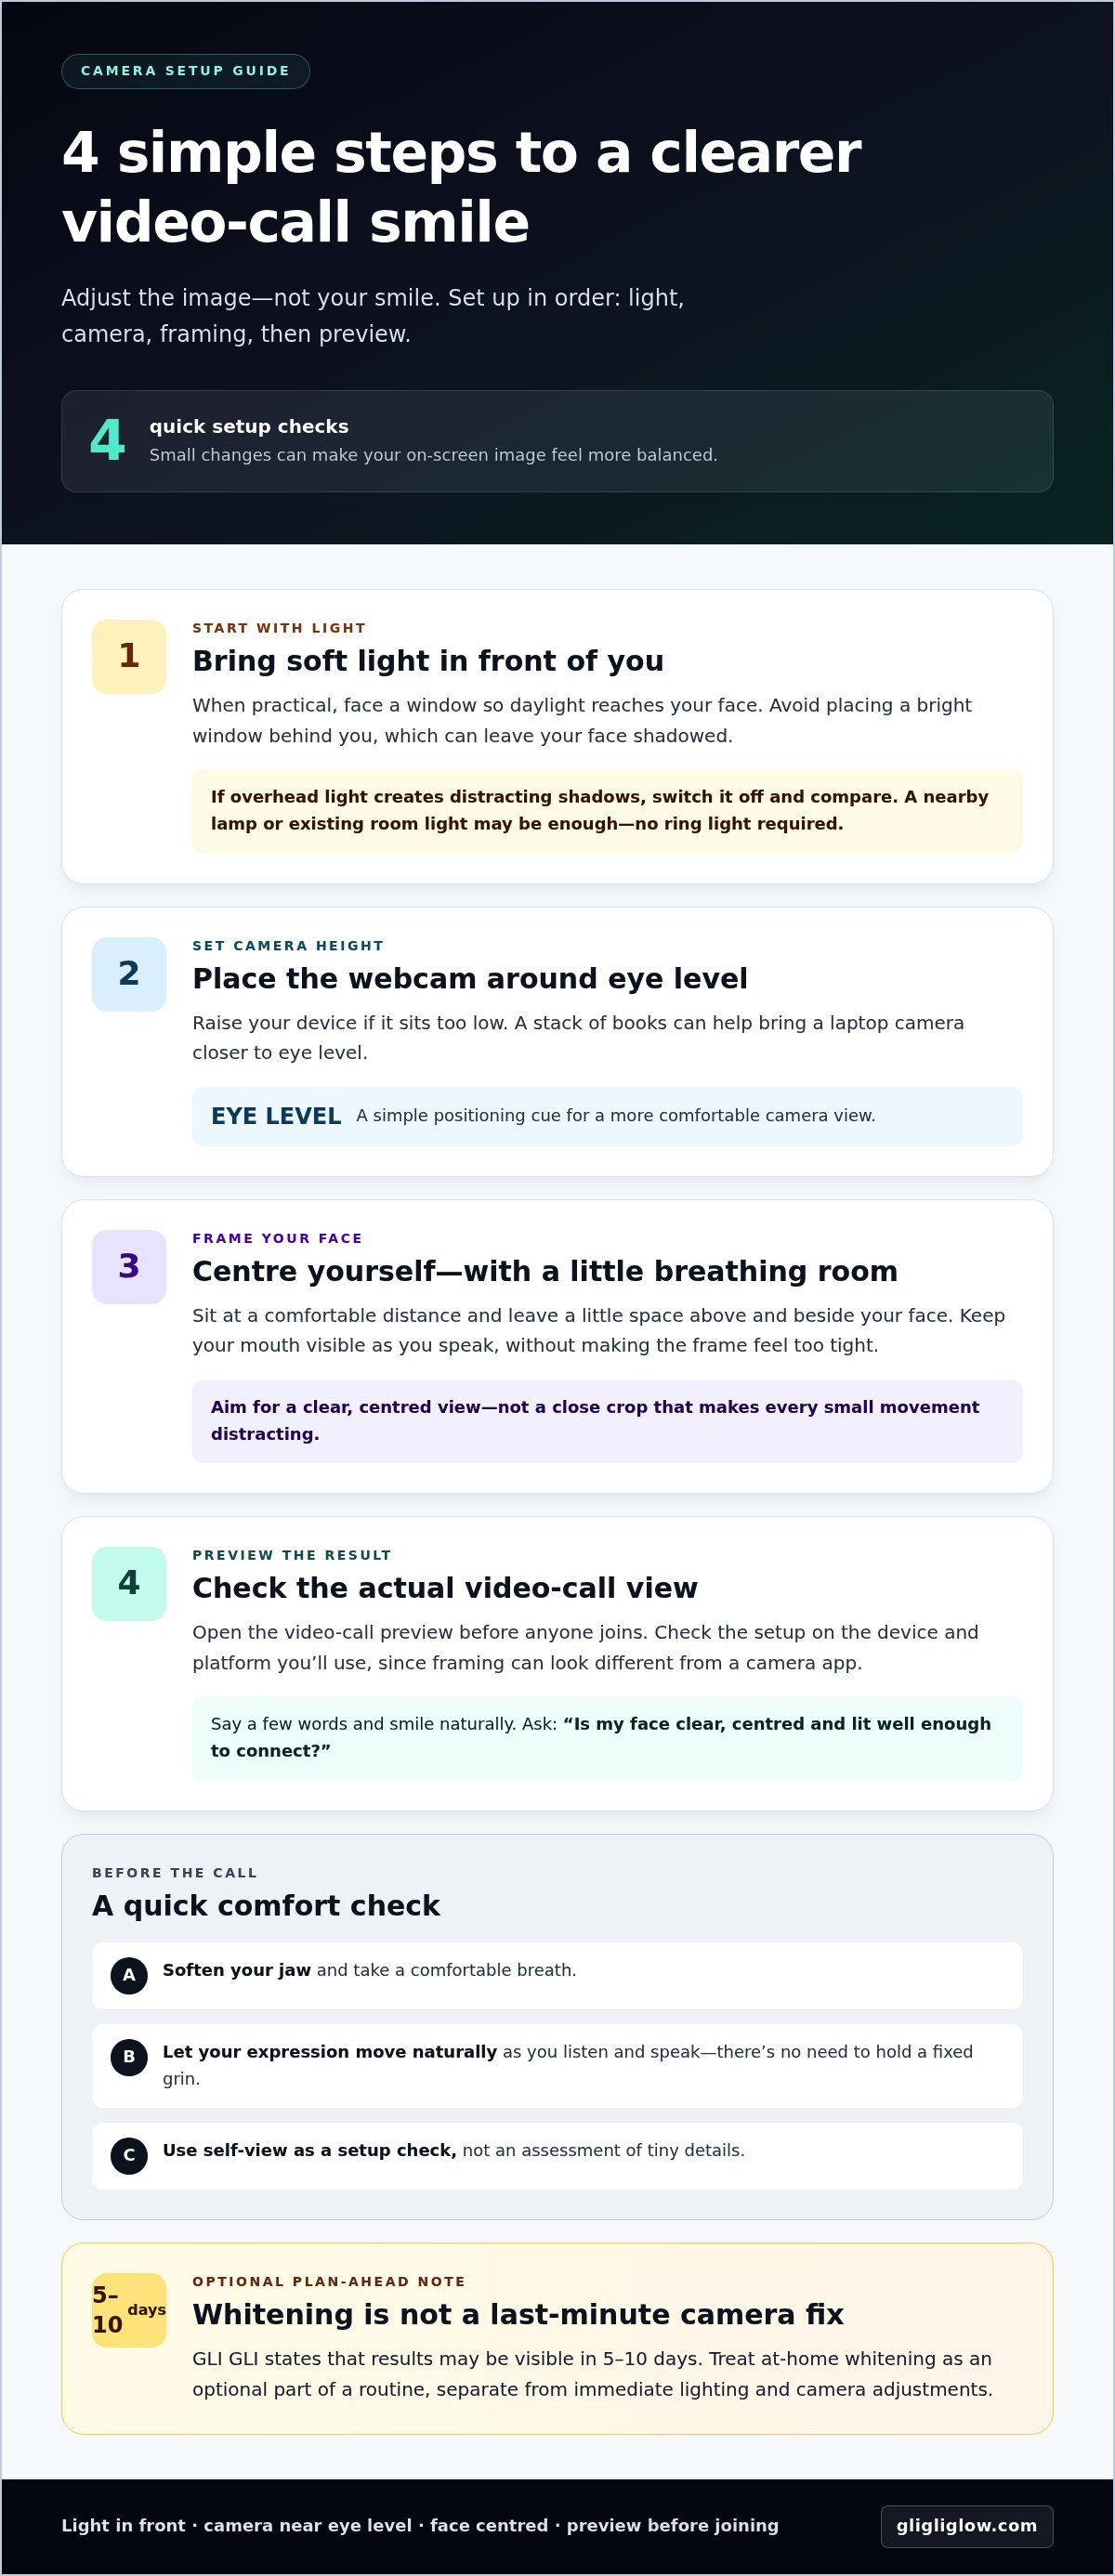
- Choose your light. If practical, sit facing a window so soft daylight falls towards your face. If the window is behind you, turn your seat around to avoid a bright background and a shadowed face.
- Reduce harsh light. Switch off strong overhead lighting if it creates distracting shadows, then compare the view. A nearby lamp or the room’s existing light may be enough. There’s no need to buy a ring light.
- Position the camera. Raise your device so the webcam sits around eye level. A stack of books can help if your laptop is positioned too low.
- Frame and preview. Keep your face comfortably centred, with a little space around it. Open the actual video-call preview and check the setup before anyone joins.
Start with light in front of you, a camera near eye level and a quick preview before the call. Those adjustments can make the image feel more balanced without turning your desk into a studio.
Find flattering light without overcomplicating your setup
Look for soft, even light that reaches your face from in front. Face a window when practical, but don’t worry if daylight isn’t available. Test your preview with strong overhead light reduced, and avoid sitting directly in front of a bright window or lamp. Compare the views, then choose the one that looks clear and comfortable to you.
Adjust framing and check your Zoom preview
Set your camera around eye level and leave a little breathing room above and beside your face. Sit at a comfortable distance, then speak a few words and smile as you naturally would. Your mouth should remain visible as you talk, without the frame feeling so tight that every small movement becomes distracting.
Check the video on the device and platform you’ll use for the call. A setup that looks fine in a laptop’s camera app may feel different in the Zoom preview because the framing can change. Look at the overall image rather than inspecting individual features: is your face clear, centred and lit well enough to connect with the person on the other end?
If you’re planning ahead for a brighter-looking smile, explore at-home teeth whitening options as a separate part of your routine. Lighting and framing are immediate camera adjustments. Whitening is optional and not a last-minute fix.
Use Simple Smile and Expression Tips That Look Natural on Camera
The best zoom-ready smile tips help you feel at ease, rather than asking you to hold a perfect pose. Before the call, let your jaw soften and take a comfortable breath. You don’t need to keep smiling while you wait for everyone to join. Let your expression settle naturally, then respond to the conversation as it happens.
A fixed grin can feel tiring and look unlike the way you normally greet someone. Try one short rehearsal: say your opening line aloud, look towards the camera and notice whether your expression feels comfortable. The aim is to feel ready to connect, not to inspect every detail of your face.
Practise a relaxed smile instead of a held pose
Choose a simple greeting such as “Hi, it’s lovely to see you” or the first sentence of your presentation. Say it once or twice while looking towards the camera. Let your smile appear as it would in a real conversation, then relax your face again. A brief run-through can make the opening feel familiar without turning preparation into repeated scrutiny of your self-view.
Check in with yourself, not just the screen. Are you clenching your jaw? Take an easy breath and let your lips rest before speaking. If your smile feels comfortable, you’re ready. If it feels forced, ease back and use a warmer, smaller expression. There’s no need to match a posed photo or keep your teeth showing throughout the meeting.
Do a quick, everyday smile-care check
Keep pre-call care familiar. Brush as you normally would, and rinse with water if you’d like to freshen up. These are everyday hygiene steps, not instant whitening methods, so don’t expect them to change tooth colour before the meeting. A calm, consistent routine is a better fit than trying an unfamiliar quick fix just before you go on camera.
Before opening the meeting, take a quick look in a mirror. Check for food residue, lipstick on your teeth or anything distracting around your lips. Make any simple adjustment, then move on. A glance is enough. You don’t need to keep returning to the mirror or reopening your preview to search for tiny imperfections.
- Unclench: Let your jaw rest before you speak.
- Rehearse: Say your greeting once or twice, then stop.
- Refresh: Brush and rinse as part of your usual routine.
- Check: Look for visible residue or lipstick, then focus on the call.
These small habits keep preparation practical and low-pressure. Your expression can change as you listen, talk or laugh. Let it move naturally, and give yourself permission to be present rather than monitoring your smile from start to finish.
Follow This Zoom-Ready Smile Checklist Before Your Next Call
Keep this checklist handy for your next video meeting. It breaks preparation into three moments: plan ahead, do a short pre-call check, then join and focus on the conversation. The aim isn’t to inspect your appearance until everything feels perfect. Make useful adjustments, give yourself one final glance and let it be enough.
Earlier preparation
Before the meeting day, choose a spot where you can sit comfortably and check what light is available. If possible, test your camera and the call’s video preview ahead of time, especially if you’re using a different device or room. That gives you time to make small changes without the pressure of guests waiting. Save this checklist somewhere easy to revisit.
- Choose a comfortable spot: Notice where the light comes from and whether the background feels suitable.
- Test your setup: Open the video preview on the device and platform you’ll use, then adjust anything distracting.
- Plan a backup: Decide whether you can turn towards a window, move nearer to softer light or raise the device if needed.
A few minutes before the call
Do one quick scan of the camera position, background, light direction and on-screen preview. Take a sip of water and check in a mirror for visible food residue. Then settle into a posture you can maintain comfortably and get your opening greeting in mind. Keep the check brief. If the image is clear and you feel ready, close the preview and move on.
- Check the image: Make sure your face is visible and the camera feels comfortably positioned.
- Refresh: Sip water and look for anything noticeable on your teeth or lips.
- Get settled: Sit comfortably and prepare a natural first line.
If your setup is not ideal
Work with what you have. Move closer to available soft light if practical, or turn so a bright window isn’t directly behind you. If the camera angle feels awkward, reposition the device rather than forcing your face into a strained pose. A tidy, clear image is helpful, but connection comes from listening and communicating, not from a flawless frame.
As you join
Take one comfortable breath, let your jaw rest and greet the group in your own way. If something small looks different once the call starts, resist the urge to keep checking yourself. These zoom-ready smile tips are a guide, not a test. Save the checklist, use what’s practical and put your attention back on the people in the meeting.
If a brighter smile is part of your longer-term preparation, you can explore at-home teeth whitening options and plan ahead rather than expecting a last-minute change.
Plan Ahead if a Brighter Smile Is Part of Your Zoom Look
A brighter-looking smile can be part of your personal plan, but whitening is optional. For the call itself, lighting, framing and a comfortable expression are the immediate adjustments. Whitening is a separate routine that takes planning, so don’t feel you need to make a last-minute change just because a meeting is coming up.
Why last-minute whitening is not the camera checklist
Give yourself time to understand and follow the product directions. GLI GLI states that results with its whitening products may be visible in 5-10 days, and its product information describes results of up to eight shades whiter. These are product claims, not guaranteed outcomes, and individual results can vary. They’re a reason to plan ahead, not to try extra sessions before a call.
The stated use for the kit is one session per day. Stick to that guidance and don’t use it more often to chase a faster change. If you’re considering whitening and have experienced tooth sensitivity, factor that into your decision and follow the instructions carefully. Avoid starting an unfamiliar routine right before an important event, when you may not have time to see how it suits you.
An at-home option for readers planning in advance
The Sparkle Booster Teeth Whitening Kit is an optional at-home choice for people who want to plan ahead. It includes an LED whitening device, two PAP gel syringes and a Remineralization Pen. Use the product as directed, including its one-session-per-day guidance. The included pen is part of the kit, but don’t treat it as a promise that sensitivity will be prevented.
To learn more before deciding whether whitening fits your routine, use the at-home teeth whitening kit guide for broader product education. The key is to make an informed, unhurried choice that works for you, rather than trying to transform your smile on the day of a video call.
Keep the distinction simple: adjust your camera setup for an immediate on-screen difference; consider whitening only as a planned-ahead option. Your zoom-ready smile tips checklist still starts with feeling comfortable on camera. A brighter smile may be one personal preference, but it isn’t a requirement for looking prepared, connecting well or showing up confidently.
Make Your Next Video Call Feel More Like You
Your next call is a chance to focus on the conversation, not chase a camera-perfect image. Let preparation be a small act of self-care, then give yourself permission to show up as you are. The most helpful zoom-ready smile tips are the ones that make confidence feel natural, not like another task on your to-do list.
If a brighter smile is part of your longer-term plans, the GLI GLI Sparkle Booster Teeth Whitening Kit includes two PAP gel syringes and a Remineralization Pen. GLI GLI states that results may be visible in 5-10 days; this is a product claim, not a guaranteed outcome. Follow the kit’s instructions as you plan your routine.
Explore the GLI GLI Sparkle Booster Teeth Whitening Kit if you’d like to learn more about this at-home option. Whether or not you choose whitening, you can step into your next video call with a little more ease. Your genuine smile is ready to make an impression.
Frequently Asked Questions
How can I look better on Zoom without changing my teeth?
Start with a few setup changes, not whitening or cosmetic treatment. Sit facing soft light, bring the camera to a comfortable height and check your image in the meeting preview. Then relax your face before the call begins. These zoom-ready smile tips can help you feel more prepared without changing your teeth. For example, shifting a laptop away from a bright window behind you may make your face easier to see.
What is the best lighting for a Zoom call?
Soft, even light coming from in front of you can make your face clearer and reduce distracting shadows. A window can work well if you sit facing it, but you don’t need special equipment. Try turning off harsh overhead lighting or moving a lamp so the light reaches your face more evenly. Check your preview after each small change, and use whichever available setup feels most comfortable.
Where should I position my camera for a video call?
Place the camera near eye level and frame your face comfortably near the centre of the screen. If you’re using a laptop on a low desk, raising it slightly can create a more natural viewing angle. Open the actual meeting preview before the call, since the framing may differ from other camera apps. Make a small device adjustment if needed, then check that your face stays in frame when you sit naturally.
How do I smile naturally on camera?
Relax your jaw and practise saying your greeting once while looking towards the camera. Notice whether your expression feels comfortable, rather than trying to make it look perfect. You might say “Good morning, everyone” or your first line for a presentation, then let your face rest. A natural expression can change as you speak and listen, so there’s no need to hold a fixed grin throughout the meeting.
Can teeth whitening make my smile Zoom-ready overnight?
Don’t count on overnight whitening for a video call. GLI GLI states that results with its kit may be visible in 5-10 days, which is a product claim, not a guaranteed result. If you choose to whiten, follow the kit’s instructions and don’t exceed one use per day. For a call happening soon, focus on your camera setup and comfort instead of adding an extra whitening session.
How far ahead should I plan at-home teeth whitening before an event?
Treat whitening as a planned routine, separate from last-minute camera adjustments. GLI GLI product information states that results may be visible in 5-10 days, but timing and outcomes aren’t guaranteed. If you’re considering whitening before an event, allow time to follow the directions as written rather than starting on the day itself. Keep each use within the product’s stated limit of one session per day.
What should I check just before joining a Zoom call?
Make one brief check: look at the meeting preview, notice whether light is reaching your face and confirm your face is comfortably framed. In a mirror, check for visible food residue, then settle on an easy opening expression. That’s enough. If the image is clear and you’re ready to speak, close the preview and join. Rechecking repeatedly can distract you from the conversation you’re about to have.


